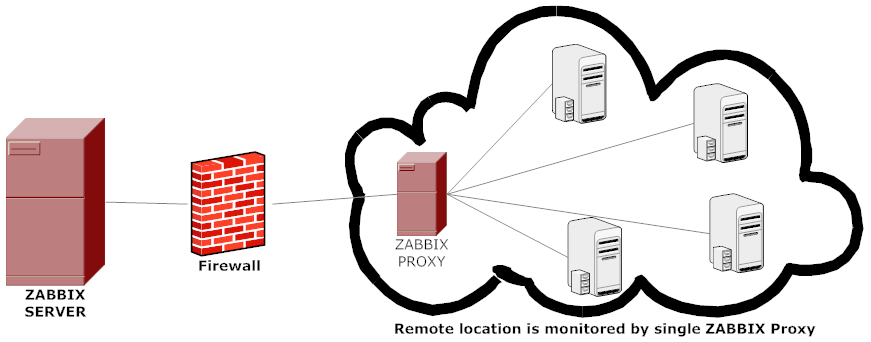
A Zabbix proxy can collect performance and availability data on behalf of the Zabbix server. This way, a proxy can take on itself some of the load of collecting data and offload the Zabbix server.
Also, using a proxy is the easiest way of implementing centralized and distributed monitoring, when all agents and proxies report to one Zabbix server and all data is collected centrally.
A Zabbix proxy can be used to:
- Monitor remote locations
- Monitor locations having unreliable communications
- Offload the Zabbix server when monitoring thousands of devices
- Simplify the maintenance of distributed monitoring
In this article, we will show you how to install and configure a Zabbix Proxy on CentOS 7 / RHEL 7 server using Mariadb/MySQL database. For the purpose of the installation of a proxy we need a user super administrator rights. If you didn’t yet installed a Zabbix server Check our previous tutorials to learn how to install Zabbix Server on CentOS 7 / RHEL 7 server or Ubuntu 16.04 LTS server:
- How To Install Zabbix 3.4 Monitoring Server On Ubuntu 16.04 LTS
- How To Install Zabbix 3.4 Server On CentOS 7 / RHEL 7
- How to install Zabbix Agent on Ubuntu 16.04 LTS
- How to install Zabbix Agent on CentOS 7 / RHEL 7
Installing Zabbix Proxy
– First we need to import the zabbix GPG key and to add the Zabbix repository to our server:
[root@ylclzbxprx01 ~]# rpm --import http://repo.zabbix.com/RPM-GPG-KEY-ZABBIX
[root@ylclzbxprx01 ~]# rpm -ivh http://repo.zabbix.com/zabbix/3.4/rhel/7/x86_64/zabbix-release-3.4-1.el7.centos.noarch.rpm
– Next step is to install our proxy using the following command:
[root@ylclzbxprx01 ~]# yum install zabbix-proxy-mysql
Creating Zabbix Proxy Database
– First we need to install MariaDB
[root@ylclzbxprx01 ~]# yum install mariadb-server
– Enable/ Restart MariaDB Server at boot using the following command:
[root@ylclzbxprx01 ~]# systemctl enable mariadb && systemctl start mariadb
– Don’t forget to set a password for the root using mysql_secure_installtion, take a look to this tutorial: Securing MySQL server / Mariadb with mysql_secure_installation
– Now we need to create the zabbix proxy database and grant access to the zabbix proxy user
[root@ylclzbxprx01 ~]# mysql -u root -p
Enter password:
Welcome to the MariaDB monitor.  Commands end with ; or \g.
Your MariaDB connection id is 25
Server version: 5.5.56-MariaDB MariaDB Server

Copyright (c) 2000, 2017, Oracle, MariaDB Corporation Ab and others.

Type 'help;' or '\h' for help. Type '\c' to clear the current input statement.

MariaDB [(none)]> create database zabbix_proxy character set utf8 collate utf8_bin;

MariaDB [(none)]> grant all privileges on zabbix_proxy.* to zabbixuser@localhost identified by "Password";
MariaDB [(none)]> flush privileges;
– Then import initial schema. Make sure to insert correct version for zabbix-proxy-mysql-3.4.X
[root@ylclzbxprx01 ~]# zcat /usr/share/doc/zabbix-proxy-mysql-3.4.X/schema.sql.gz | mysql -u zabbixuser zabbix_proxy -p
configuring Zabbix proxy
– Open the zabbix_proxy.conf file and change the following parameters:
[root@ylclzbxprx01 ~]# vi /etc/zabbix/zabbix_proxy.conf

Server=<IP of your zabbix server>
Hostname=<Name of your proxy>
DBName=<Name of your proxy database>
DBUser=<Name of your proxy user>
DBPassword=<Password of your proxy user>
– Execute the following command to enable connection between the Zabbix server and Zabbix proxy :
[root@ylclzbxprx01 ~]# firewall-cmd --permanent --add-port=10050/tcp
[root@ylclzbxprx01 ~]# firewall-cmd --permanent --add-port=10051/tcp
[root@ylclzbxprx01 ~]# firewall-cmd --reload
Starting/Enabling Zabbix proxy
– After finishing the installation and the configuration, use the following commands to enable and restart the Zabbix Proxy service at system boot
[root@ylclzbxprx01 ~]# systemctl enable zabbix-proxy
[root@ylclzbxprx01 ~]# systemctl start zabbix-proxy
Note: If you have issues starting the zabbix-proxy daemon and you got this error “Job for zabbix-proxy.service failed because a configured resource limit was exceeded. See “systemctl status zabbix-proxy.service” and “journalctl -xe” for details“, you need to set Selinux roles using the audit2allow command:
– Install the policycoreutils-python package using the following command:
# yum install policycoreutils-python
– Use the following commands to create the Selinux rule and enable it:
[root@ylclzbxprx01 ~]# cat /var/log/audit/audit.log | grep zabbix_proxy | grep denied | audit2allow -M zabbix_proxy
[root@ylclzbxprx01 ~]# semodule -i zabbix_proxy.pp
– Use the following command to enable zabbix proxy to use the network:
[root@ylclzbxprx01 ~]# setsebool -P zabbix_can_network=1
– Finally start the Zabbix proxy service:
[root@ylclzbxprx01 ~]# systemctl start zabbix-proxy
– Or you can use this Selinux role, tested on CentOS 7.3:
[root@ylclzbxprx01 ~]# vi zabbix_proxy.te

module zabbix_proxy 1.0;

require {
        type zabbix_t;
        type zabbix_port_t;
        class process setrlimit;
        class tcp_socket name_connect;
}

#============= zabbix_t ==============
allow zabbix_t self:process setrlimit;

#!!!! This avc is allowed in the current policy
allow zabbix_t zabbix_port_t:tcp_socket name_connect;
[root@ylclzbxprx01 ~]# checkmodule -m -M zabbix_proxy.te -o zabbix_proxy.mod
[root@ylclzbxprx01 ~]# semodule_package -m zabbix_proxy.mod -o zabbix_proxy.pp
[root@ylclzbxprx01 ~]# semodule -i zabbix_proxy.pp
Registering Zabbix Proxy in Zabbix Frontend
To register a proxy in Zabbix frontend:
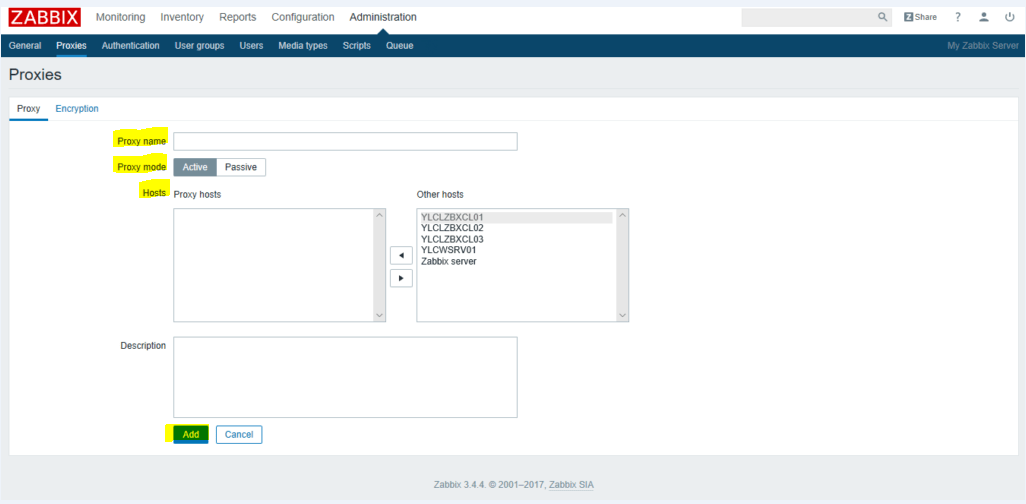
– Go to: Administration –> Proxies
– Click on Create proxy
– Enter the proxy name. Must be the same as the name entered in the Hostname parameter in the proxy configuration file
– Select the proxy mode:
- Active – the proxy will connect to the Zabbix server and request configuration data
- Passive – Zabbix server connects to the proxy
– Select the Hosts that should be monitored by the proxy .
– Click Add button.
We hope this tutorial was enough Helpful. If you need more information, or have any questions, just comment below and we will be glad to assist you!
PS. If you like this post please share it with your friends on the social networks using the buttons below.Thanks.


28 comments
Hi..
I am deploying Zabbix Solution with follwoing details. 3 VM machines. ” Centos 7″.
Zabbix server IP: 192.168.22.131
Zabbix Proxy IP:192.168.22.129
Zabbix Agent IP: 192.168.22.133
First i deployed zabbix mointoring solution only with Zabbix server and zabbix agent. It was working fine. Now i have introduced Zabbix proxy in between zabbix server and agent but in zabbix front end, no data is coming. Proxy is in ” active mode”.In front end proxy name is same as Hostname=Zabbix proxy. Please guide how to troubleshoot this issue and how to resolve it.
========================================
Some basic configurations in the zabbix agent
vi /etc/zabbix/zabbix_agentd.conf
Server=192.168.22.129
ServerActive=192.168.22.129
Hostname=Zabbix proxy
==========================================
Some basic configurations in the zabbix proxy
vi /etc/zabbix/zabbix_proxy.conf
Hostname=Zabbix proxy
Server=192.168.22.131
ProxyMode=0 # it is uncommented in .conf file
# ServerPort=10051(it is commented)
# ListenPort=10051(it is commented)
DBName=proxydb
DBUser=proxyuser
DBPassword=puser123
===============================================
Some basic configurations in the zabbix server
DBName=zabbixdb
DBUser=zabbixuser
DBPassword=user123
===========================================================================
Did you changed the configuration of your Zabbix Agent file to the Ip address of your zabbix Proxy ? make sure the firewall ports are opened .
Thanks for your Reply.
I have checked again all configuration. And restarted the whole system . Now it is working fine.
While running this command,
semodule -i zabbix_proxy.pp
I’m getting an error, job for zabbix.proxy.service failed because a configured source limit was exceeeded
Hi Ravi,
try to run this command
cat /var/log/audit/audit.log | grep zabbix | grep deniedto display the output and after that run the commands:cat /var/log/audit/audit.log | grep zabbix | grep denied | audit2allow -M zabbix_proxy
semodule -i zabbix_proxy.pp
Still the same error, when I run the last command “semodule -i zabbix_proxy.pp”, it says unable to open Zabbix_proxy.pp (no such file or directory)
Hi,
When you run the following command
cat /var/log/audit/audit.log | grep zabbix | grep denied | audit2allow -M zabbix_proxyit should creat a file called zabbix_proxy, make sure that it created before procceding with the commandsemodule -i zabbix_proxy.ppthere is a workaround solution by putting Selinux in permissive mode or disabled
Thanks, I disabled selinux and tried again, now my proxy is running, however the status of zabbix server is in not running status.
When I run systemctl status zabbix-server on this machine, I get some error. on zabbix console it says “Empty response received from Zabbix server “127.0.0.1”.
Please help!
hi,
are you running a zabbix server and zabbix proxy on the same machine?
First I installed a zabbix server and then zabbix proxy on the same machine in our local infrastructure.
I have another zabbix server on Azure.
What I want to achieve is to get the data on Azure zabbix server from my internal zabbix server.
It’s not raccomanded to install zabbix server and zabbix proxy on the same server. Zabbix proxy should gather data and send it to a remote zabbix server.
I got it.
So shall I stop zabbix server on this machine and let proxy run, or remove zabbix server completely?
The best practice is to not settle in the same server.
I just formatted my machine and setup zabbix proxy only. Followed all your steps.
Now, my hosts are not showing any agent availability on zabbix portal.
When I checked the logs of zabbix proxy, it says “Unable to connect to the server {Ip of my zabbix server} :10051 : {13} permission denied.”
What am I doing wrong here?
Did you disabled Selinux?
Yes it is disabled.
when you disabled, did you rebbot the server?
Yes I did.
Okay, did you check your firewall ?
Yes, both ports 10050 and 10051 are showing up on my firewall.
So, could you reach your zabbix server? You said that your zabbix server in the cloud, so you need to make sure that your zabbix server is listening and nothing is blocking the traffic between your zabbix server and proxy
They both can ping each other.
When I run “nc -v -z (zabbix server ip) 10050” from my proxy server, it says connected to (zabbix server ip) 10050.
If you are using the port 10051 means that you configured your proxy to work as passive mode, so when you add your zabbix proxy on the zabbix server front-end you have to select passive, just for your knowledge: zabbix proxy active use the port 10051 and 10050 for passive mode. So I invite you to check your configuration
If I look at my front end, the proxy last seen time is getting updated regularly which shows that proxy is reachable from server.
Where else should I look?
THANK YOU SO MUCH guys for fixing this issue. I couldn’t have done it without your help!
After rigorous troubleshooting, it was found to be a version mismatch issue between the zabbix server and zabbix proxy.
After matching the version, proxy started working fine.
All good now.
Is it possible to setup Zabbix Proxy in HA ? i have currently running zabbix server & maria DB in HA… Can you please guide ?
Hi,
you can implement a HA using Pacemaker. you can take a look a this tutorial:
http://yallalabs.com/linux/how-to-configure-a-high-availability-zabbi-server-using-pacemaker-on-centos-7-rhel-7/use the same concept without the Apache resource
Hi!
I have a error:
error: Error de dependencias:
zabbix-proxy-implementation = 2.4.8-1.el7 es necesario por zabbix-proxy-2.4.8-1.el7.x86_64
Centos 7
Best regards