After we have installed zabbix server on CentOS/RHEL 7. In this article will demonstrate how to install zabbix agent on CentOS/RHEL 7 systems.
Environment:
- Hostname = webserver02.yallalabs.com
- IP Address = 192.168.1.72
- OS = CentOS 7 / RHEL 7
Step 1 – Add Required Repository
Before installing Zabbix Agent first we should import RPM GPG Key and add the Zabbix yum repository:
[root@webserver02 ~]# rpm --import http://repo.zabbix.com/RPM-GPG-KEY-ZABBIX
[root@webserver02 ~]# rpm -ivh http://repo.zabbix.com/zabbix/3.2/rhel/7/x86_64/zabbix-release-3.2-1.el7.noarch.rpm
Step 2 – Install Zabbix Agent
[root@webserver02 ~]# yum install zabbix-agent -y
Step 3 – Edit Zabbix Agent Configuration
After Zabbix Agent has been successfully installed, we need to add the IP of the Zabbix monitoring server in the Zabbix Agent configuration file /etc/zabbix/zabbix_agentd.conf
[root@webserver02 ~]# vi /etc/zabbix/zabbix_agentd.conf
### Option: Server
#       List of comma delimited IP addresses (or hostnames) of Zabbix servers.
#       Incoming connections will be accepted only from the hosts listed here.
#       If IPv6 support is enabled then '127.0.0.1', '::127.0.0.1', '::ffff:127.0.0.1' are treated equally.
#
# Mandatory: no
# Default:
# Server=
Server=192.168.1.201 # Add here the IP of your Zabbix Server
#
### Option: ServerActive
# ServerActive=
#
ServerActive=192.168.1.201 # Add here the IP of your Zabbix Server
Step 4 – Enable/Start Zabbix Agent
[root@webserver02 ~]# Systemctl enable zabbix-agent
[root@webserver02 ~]# Systemctl start zabbix-agent
Step 5 – Adjust Firewall Configuration
[root@webserver02 ~]# firewall-cmd - -permanent - -add-port=10050/tcp
[root@webserver02 ~]# firewall-cmd - -reload
Step 5 – configure the host in Zabbix frontend
To add the remote host server in Zabbix frontend, do the following steps:
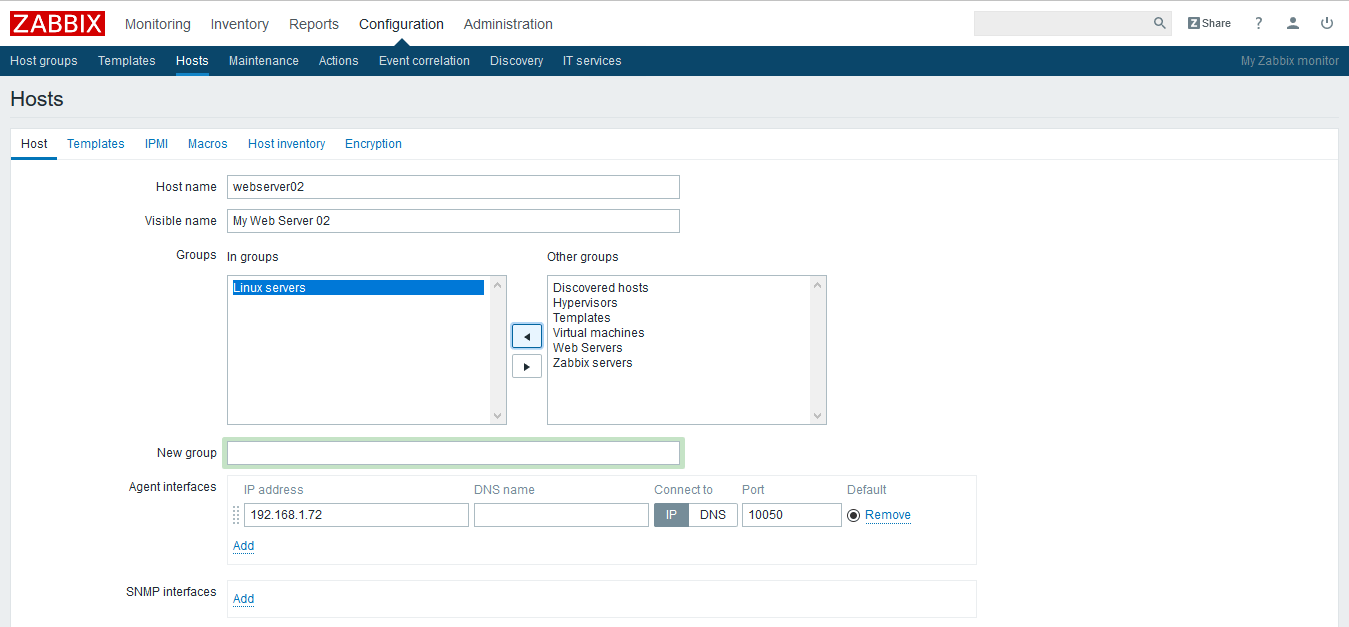
-1 Go to: Configuration -> Hosts
-2 Click on Create host to the right

-3 Fill the following paramaters of remote host server
*Enter Hostname: Hostname of Remote system
*Visible name: Name to be display in zabbix
*Group: Select the desired group for your host
*Agent interface: Ip of your host

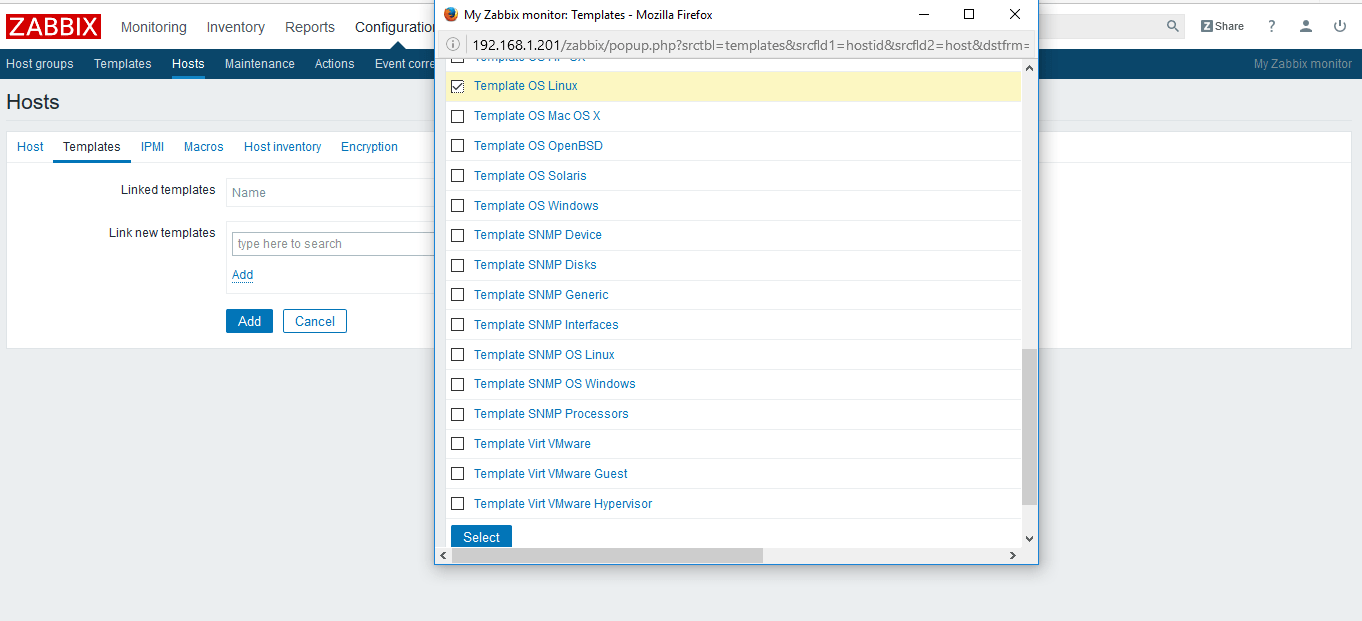
-4 Go to Templates tab and select the desired Template for your host

-5 Click on add
We hope this tutorial was enough Helpful. If you need more information, or have any questions, just comment below and we will be glad to assist you!


2 comments
[root@localhost ~]# systemctl enable zabbix-agent.service
ln -s ‘/usr/lib/systemd/system/zabbix-agent.service’ ‘/etc/systemd/system/multi-user.target.wants/zabbix-agent.service’
[root@localhost ~]# systemctl start zabbix-agent.service
Job for zabbix-agent.service failed. See ‘systemctl status zabbix-agent.service’ and ‘journalctl -xn’ for details.
[root@localhost ~]# ^
I am getting this error .Please can you help how to resolve.
Thanks
Check the log file and tell us what errore you got.