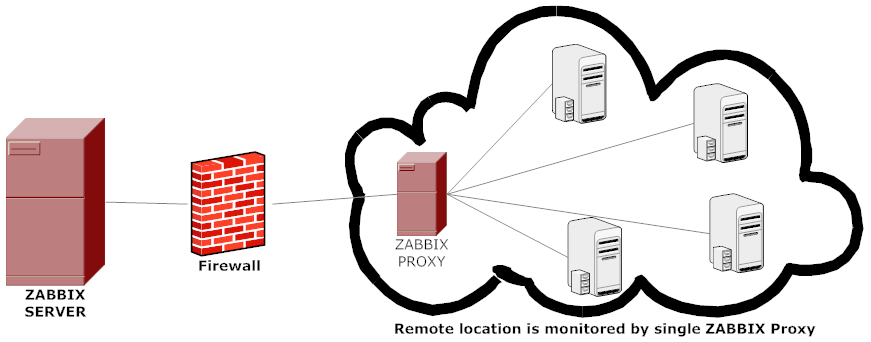
A Zabbix proxy can collect performance and availability data on behalf of the Zabbix server. This way, a proxy can take on itself some of the load of collecting data and offload the Zabbix server.
Also, using a proxy is the easiest way of implementing centralized and distributed monitoring, when all agents and proxies report to one Zabbix server and all data is collected centrally.
A Zabbix proxy can be used to:
- Monitor remote locations
- Monitor locations having unreliable communications
- Offload the Zabbix server when monitoring thousands of devices
- Simplify the maintenance of distributed monitoring
In this article, we will show you how to install and configure a Zabbix Proxy on Ubuntu 16.04 LTS server using Mariadb/MySQL database. For the purpose of the installation of a proxy we need a user super administrator rights. If you didn’t yet installed a Zabbix server Check our previous tutorials to learn how to install Zabbix Server on CentOS 7 / RHEL 7 server or Ubuntu 16.04 LTS server:
- How To Install Zabbix 3.4 Monitoring Server On Ubuntu 16.04 LTS
- How To Install Zabbix 3.4 Server On CentOS 7 / RHEL 7
- How to install Zabbix Agent on Ubuntu 16.04 LTS
- How to install Zabbix Agent on CentOS 7 / RHEL 7
Installing Zabbix Proxy
– First we need to download and install the Zabbix repository to our server:
[root@ylclzbxprx02 ~]# wget http://repo.zabbix.com/zabbix/3.4/ubuntu/pool/main/z/zabbix-release/zabbix-release_3.4-1+xenial_all.deb
[root@ylclzbxprx02 ~]# dpkg -i zabbix-release_3.4-1+xenial_all.deb
– Next step is to install our proxy using the following command:
[root@ylclzbxprx02 ~]# apt-get update
[root@ylclzbxprx02 ~]# apt-get install zabbix-proxy-mysql
Creating Zabbix Proxy Database
– First we need to install MySQL/MariaDB
[root@ylclzbxprx02 ~]# apt-get install mysql-server
– Enable/ Restart MySQL Server at boot using the following command:
[root@ylclzbxprx02 ~]# systemctl enable mysql && systemctl start mysql
– Now we need to create the zabbix proxy database and grant access to the zabbix proxy user
[root@ylclzbxprx02 ~]# mysql -u root -p
Enter password:
Welcome to the MySQL monitor.  Commands end with ; or \g.
Your MySQL connection id is 5
Server version: 5.7.17-0ubuntu0.16.04.1 (Ubuntu)

Copyright (c) 2000, 2016, Oracle and/or its affiliates. All rights reserved.

Oracle is a registered trademark of Oracle Corporation and/or its
affiliates. Other names may be trademarks of their respective
owners.

Type 'help;' or '\h' for help. Type '\c' to clear the current input statement.

mysql> create database zabbix_proxy character set utf8 collate utf8_bin;
Query OK, 1 row affected (0.08 sec)

mysql> grant all privileges on zabbix_proxy.* to zabbixuser@localhost identified by "Password";
Query OK, 0 rows affected, 1 warning (0.06 sec)

mysql> flush privileges;
Query OK, 0 rows affected (0.00 sec)

mysql> quit
Bye
– Then import initial schema. Make sure to insert correct version for zabbix-proxy-mysql-3.4.X
[root@ylclzbxprx02 ~]# zcat /usr/share/doc/zabbix-proxy-mysql-3.4.X/schema.sql.gz | mysql -u zabbixuser zabbix_proxy -p
configuring Zabbix proxy
– Open the zabbix_proxy.conf file and change the following parameters:
[root@ylclzbxprx01 ~]# vi /etc/zabbix/zabbix_proxy.conf

Server=<IP of your zabbix server>
Hostname=<Name of your proxy>
DBName=<Name of your proxy database>
DBUser=<Name of your proxy user>
DBPassword=<Password of your proxy user>
– Execute the following command to enable connection between the Zabbix server and Zabbix proxy if you are using Firewall:
[root@ylclzbxprx02 ~]# sudo ufw allow 10050/tcp
[root@ylclzbxprx02 ~]# sudo ufw allow 10051/tcp
[root@ylclzbxprx02 ~]# sudo ufw reload
Starting/Enabling Zabbix proxy
– After finishing the installation and the configuration, use the following commands to enable and restart the Zabbix Proxy service at system boot
[root@ylclzbxprx01 ~]# systemctl enable zabbix-proxy
[root@ylclzbxprx01 ~]# systemctl start zabbix-proxy
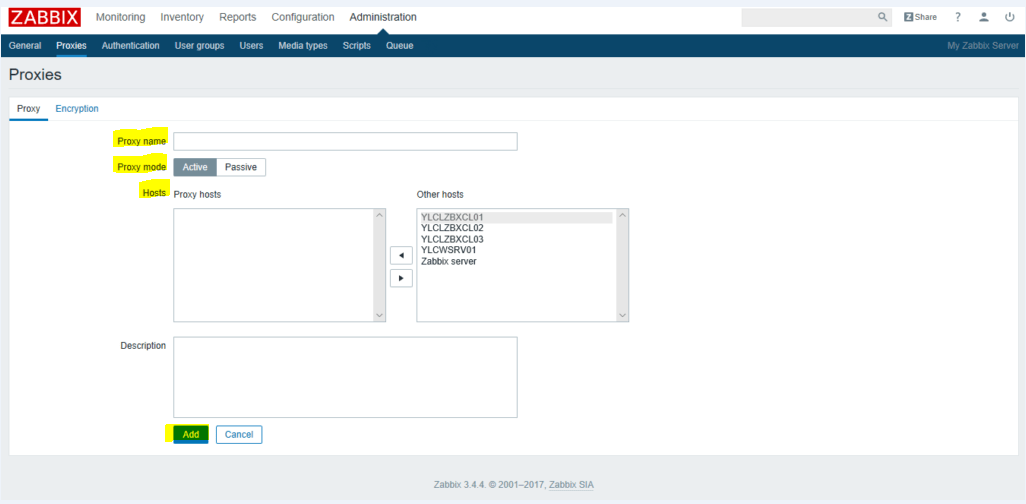
Registering Zabbix Proxy in Zabbix Frontend
To register a proxy in Zabbix frontend:
– Go to: Administration –> Proxies
– Click on Create proxy
– Enter the proxy name. Must be the same as the name entered in the Hostname parameter in the proxy configuration file
– Select the proxy mode:
- Active – the proxy will connect to the Zabbix server and request configuration data
- Passive – Zabbix server connects to the proxy
– Select the Hosts that should be monitored by the proxy .
– Click Add button.
We hope this tutorial was enough Helpful. If you need more information, or have any questions, just comment below and we will be glad to assist you!


