
Choosing a high-availability solution for MySQL to prevent downtime and data losing, is really one of the important subjects for an IT System Admin to handle. Today, we are going to present you Percona XtraDB Cluster one of the MYSQL high-availability solutions on the market.
In the first part of this tutorial ” Installing and Configuring Percona XtraDB Cluster High Availability ” we are going to show you how to install and configure Percona XtraDB Cluster on 3 CentOS 7 / RHEL 7 nodes.
Environment
This Lab will be assembled of three CentOS 7 servers/nodes and a HAProxy Load Balancer.
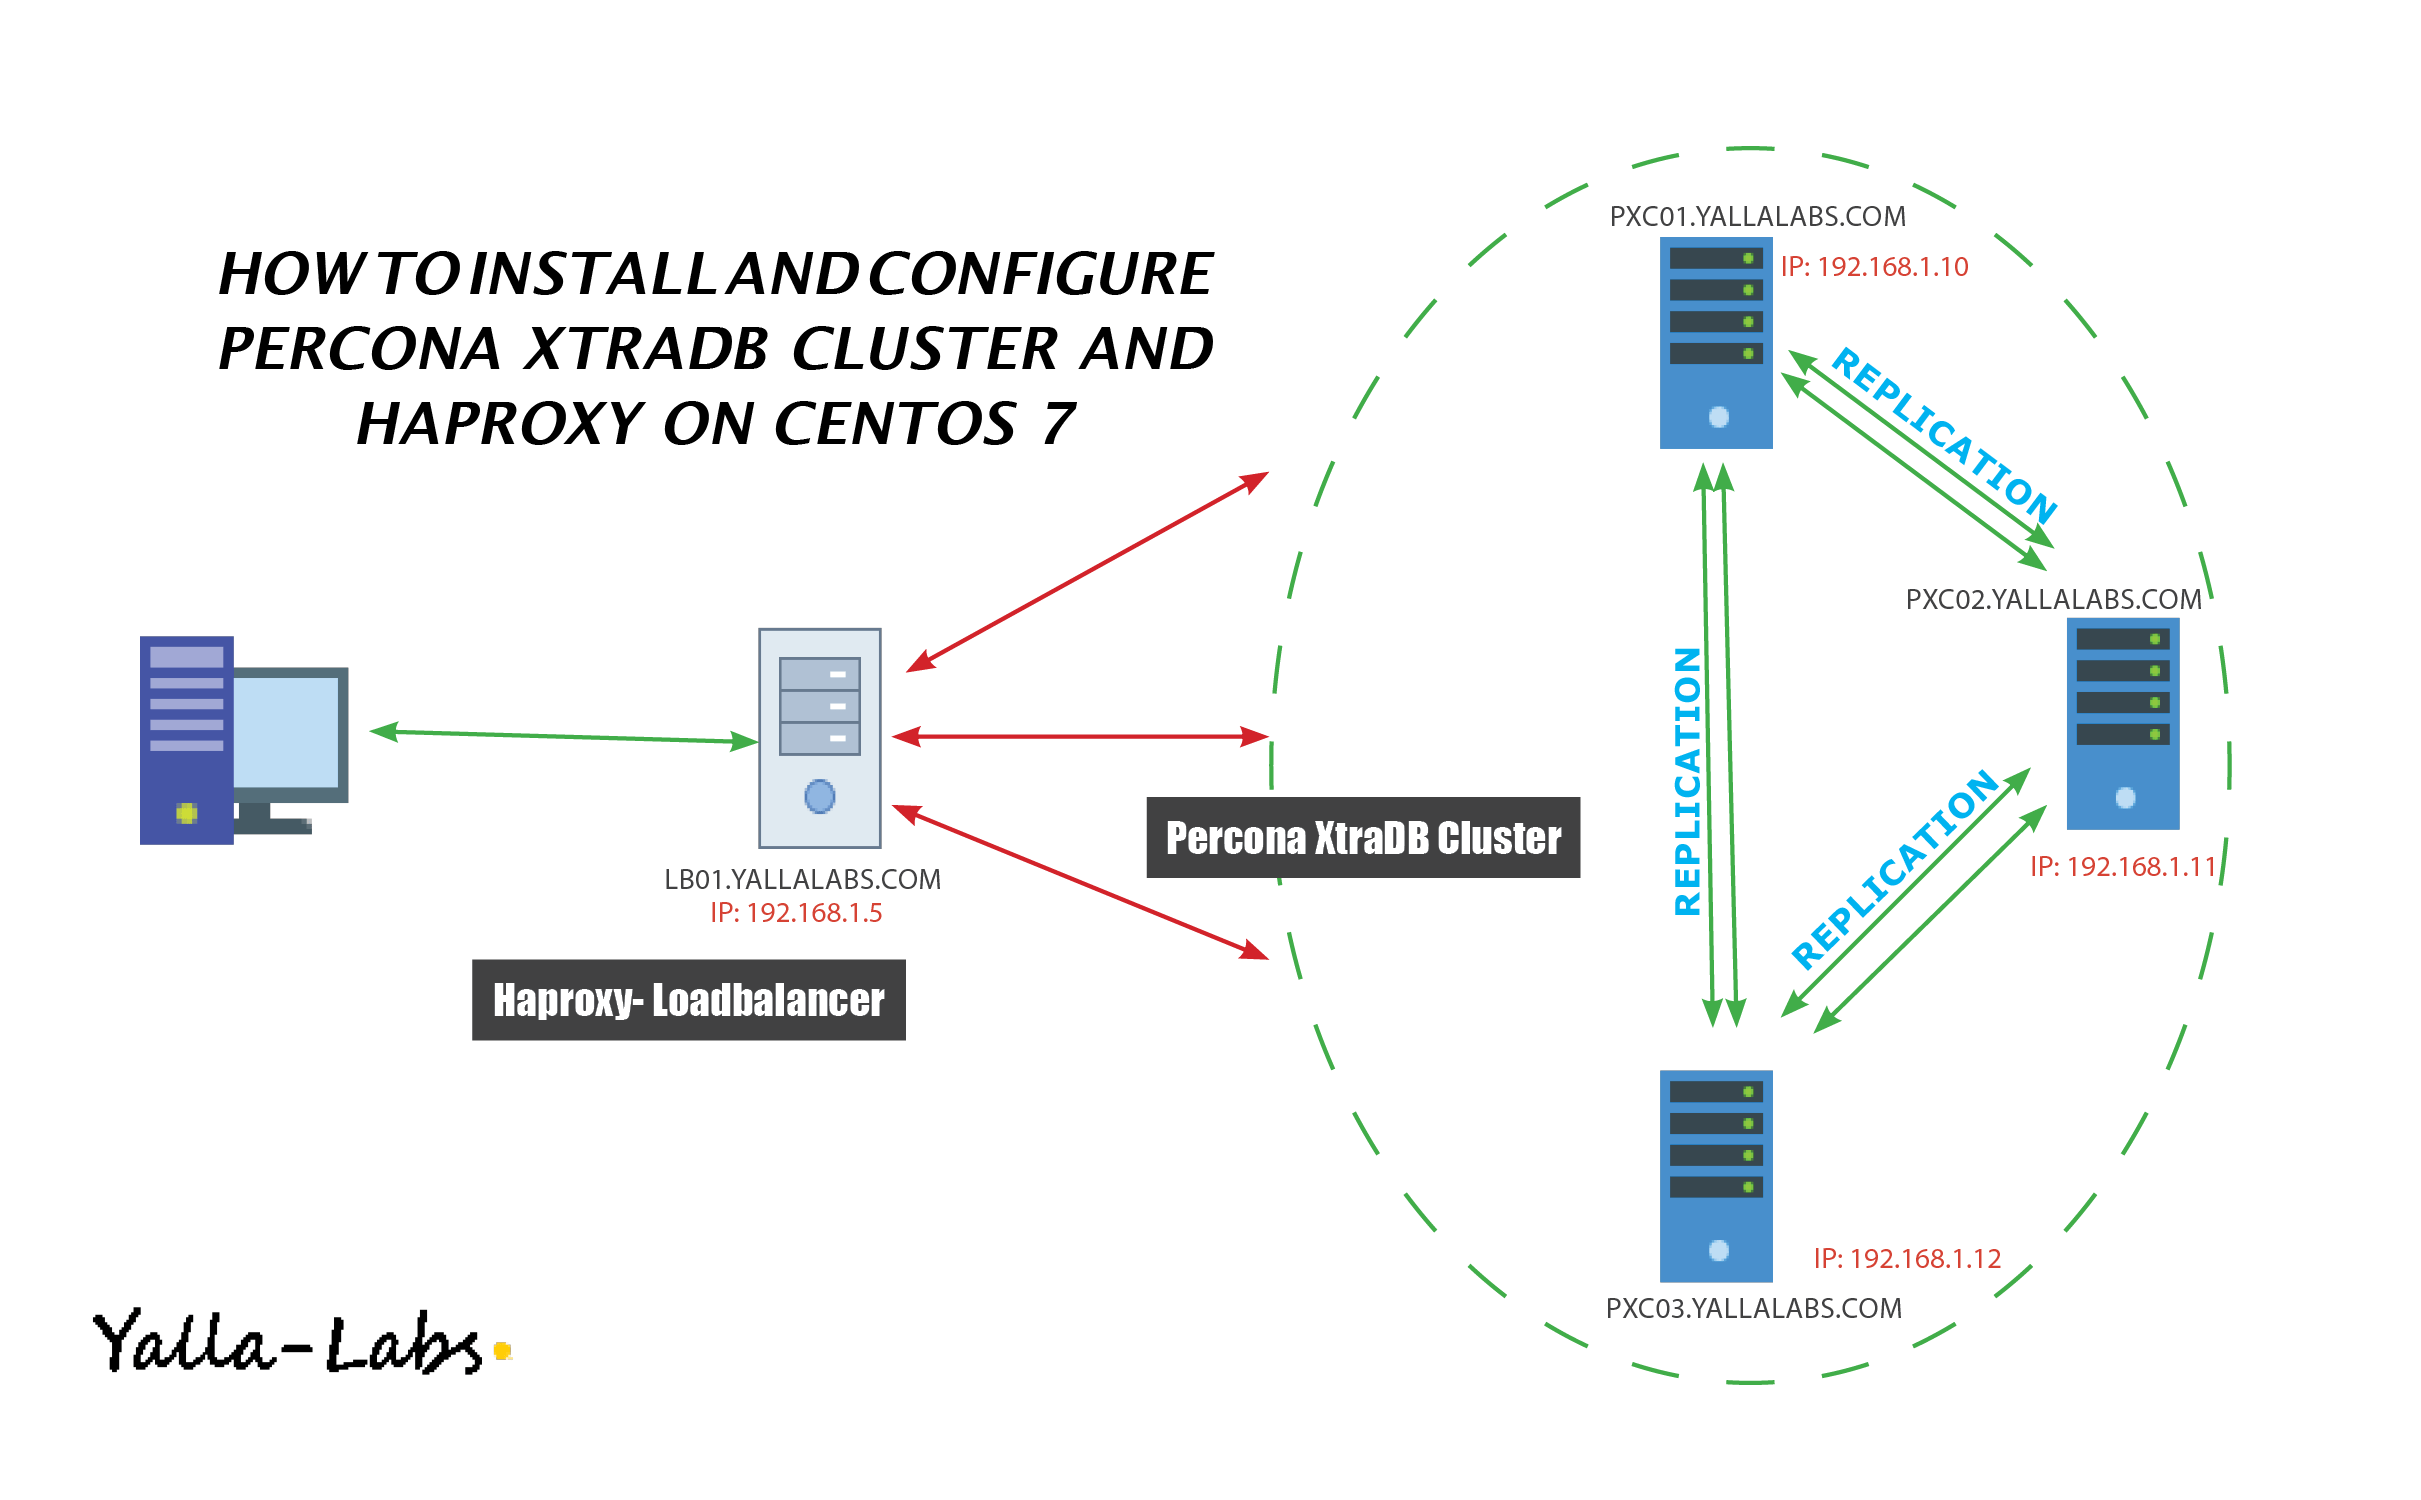
- Node 1
- Host name: pxc01.yallalabs.com
- IP address: 192.168.1.10
- Node 2
- Host name: pxc02.yallalabs.com
- IP address: 192.168.1.11
- Node 3
- Host name: pxc03.yallalabs.com
- IP address: 192.168.1.12
- Node 1
- Host name: lb01.yallalabs.com
- IP address: 192.168.1.5
Step 1: Disabling SELinux
– On all 3 Percona nodes we have to disable SELinux
[root@pxc01 ~]# sed -i -e 's/SELINUX=enforcing/SELINUX=permissive/g' /etc/selinux/config
Step 2: Firewall Adjusting
– On all 3 Percona nodes we have to configure the firewall to allow the connection to ports 3306, 4444, 4567 and 4568
[root@pxc01 ~]# firewall-cmd --zone=public --add-port=3306/tcp --permanent
success
[root@pxc01 ~]# firewall-cmd --zone=public --add-port=4567/tcp --permanent
success
[root@pxc01 ~]# firewall-cmd --zone=public --add-port=4567/udp --permanent
success
[root@pxc01 ~]# firewall-cmd --zone=public --add-port=4568/tcp --permanent
success
[root@pxc01 ~]# firewall-cmd --zone=public --add-port=4444/tcp --permanent
success
[root@pxc01 ~]# firewall-cmd --reload
success
Step 3: Conflict Packages Removing
– To avoid any conflict during the installation of Percona XtraDB Cluster, you need to remove the mysql-libs or mariadb-libs package on all the 3 nodes using the following command:
[root@pxc01 ~]# yum remove mariadb-libs -y
Step 4: Percona XtraDB Cluster Installing
1. Install the Percona repository package:
[root@pxc01 ~]# yum install http://www.percona.com/downloads/percona-release/redhat/0.1-4/percona-release-0.1-4.noarch.rpm
2. Install now the Percona XtraDB Cluster packages using the following command:
[root@pxc01 ~]# yum install Percona-XtraDB-Cluster-56 -y
– After finishing the installation Percona XtraDB Cluster use the mysql_secure_installation tool to set the root password .
[root@pxc01 ~]# mysql_secure_installation
Step 5: Percona XtraDB Cluster Configuring on the first node
– Before Start the configuration make sure that the Percona XtraDB Cluster server is not running
[root@pxc01 ~]# systemctl stop mysql
– Open /etc/my.cnf file and add the following Write-Set Replication configuration variables
[root@pxc01 ~]# cp /etc/my.cnf{,.org}
[root@pxc01 ~]# vi /etc/my.cnf

user=mysql
wsrep_provider=/usr/lib64/libgalera_smm.so
wsrep_cluster_address=gcomm://192.168.1.10,192.168.1.11,192.168.1.12
default_storage_engine=InnoDB
innodb_autoinc_lock_mode=2
wsrep_node_address=192.168.1.10
# SST method
wsrep_sst_method=xtrabackup-v2
# Cluster name
wsrep_cluster_name=cluster
# Authentication for SST method
wsrep_sst_auth="sstuser:s3cret"
– Start the first node with the following command:
[root@pxc01 ~]# systemctl start [email protected]
– After the first node has been started, we can check cluster status with the following command:
[root@pxc01 ~]# mysql -u root -p
mysql> show global status like 'wsrep%';
+----------------------------+--------------------------------------+
| Variable_name              | Value                                |
+----------------------------+--------------------------------------+
| wsrep_local_state_uuid     | c2883338-834d-11e2-0800-03c9c59e41ec |
...
| wsrep_local_state          | 4                                    |
| wsrep_local_state_comment  | Synced                               |
...
| wsrep_cluster_size         | 1                                    |
| wsrep_cluster_status       | Primary                              |
| wsrep_connected            | ON                                   |
...
| wsrep_ready                | ON                                   |
+----------------------------+--------------------------------------+
40 rows in set (0.01 sec)
– Let’s now create the SST (State Snapshot Transfer) user for the XtraBackup replication:
mysql> CREATE USER 'sstuser'@'localhost' IDENTIFIED BY 's3cret';
mysql> GRANT PROCESS, RELOAD, LOCK TABLES, REPLICATION CLIENT ON *.* TO 'sstuser'@'localhost';
mysql> FLUSH PRIVILEGES;
mysql> exit
Step 6: Percona XtraDB Cluster Configuring on the second node
– Make sure that the Percona XtraDB Cluster server is not running and add the following Write-Set Replication configuration variables in the /etc/my.cnf file
[root@pxc02 ~]# cp /etc/my.cnf{,.org}
[root@pxc02 ~]# vi /etc/my.cnf

user=mysql
wsrep_provider=/usr/lib64/libgalera_smm.so
wsrep_cluster_address=gcomm://192.168.1.10,192.168.1.11,192.168.1.12
default_storage_engine=InnoDB
innodb_autoinc_lock_mode=2
wsrep_node_address=192.168.1.11
# SST method
wsrep_sst_method=xtrabackup-v2
# Cluster name
wsrep_cluster_name=cluster
# Authentication for SST method
wsrep_sst_auth="sstuser:s3cret"
– Start the second node with the following command:
[root@pxc02 ~]# systemctl start mysql
– Check the cluster status using the following command:
[root@pxc02 ~]# mysql -u root -p
mysql> show global status like 'wsrep%';
Step 7: Percona XtraDB Cluster Configuring on the third node
– Open /etc/my.cnf file and add the following Write-Set Replication configuration variables
[root@pxc02 ~]# cp /etc/my.cnf{,.org}
[root@pxc02 ~]# vi /etc/my.cnf

user=mysql
wsrep_provider=/usr/lib64/libgalera_smm.so
wsrep_cluster_address=gcomm://192.168.1.10,192.168.1.11,192.168.1.12
default_storage_engine=InnoDB
innodb_autoinc_lock_mode=2
wsrep_node_address=192.168.1.12
# SST method
wsrep_sst_method=xtrabackup-v2
# Cluster name
wsrep_cluster_name=cluster
# Authentication for SST method
wsrep_sst_auth="sstuser:s3cret"
– Start the third node with the following command:
[root@pxc03 ~]# systemctl start mysql
Step 8: Replication Test
– To test replication, we will create a new database on first node, create a table for that database on the second node, and add some records to the table on the third node.
1- Create clustertest database on the first node:
[root@pxc01 ~]# mysql -u root -p
mysql> CREATE DATABASE clustertest;
Query OK, 1 row affected (0.01 sec)
2- Create a employees table for the clustertest database on the second node:
[root@pxc02 ~]# mysql -u root -p
mysql> CREATE TABLE clustertest.employees(number int, name varchar(50));
Query OK, 1 row affected (0.01 sec)
3- Add some records to the employees table on the third node:
[root@pxc03 ~]# mysql -u root -p
mysql> INSERT INTO clustertest.employees values(1,'Waderni Lotfi');
Query OK, 1 row affected (0.01 sec)
4- Check the replication data on the all 3 nodes using the following query:
mysql> SHOW DATABASES;
mysql> SELECT * FROM clustertest.employees;
– In the second part of the tutorial we will install HaProxy for the Load balancing.
We hope this tutorial was enough Helpful. If you need more information, or have any questions, just comment below and we will be glad to assist you!
PS. If you like this post please share it with your friends on the social networks using the buttons below.Thanks.