LEMP is an acronym for Linux, Engine-X (Nginx) HTTP Server, MariaDB or MySQL Database Server and PHP-FPM Scripting Language. In this tutorial, we’ll provide a step by step instructions about how to set up LEMP Stack on Ubuntu 18.04 LTS.
Prerequisites
You’ll need to be logged in as a user with sudo privileges in order to install the LEMP Stack.
Step 1. Installing Nginx
Nginx is available in Ubuntu repositories. Update the packages index and install Nginx with the following commands:
$ sudo apt update
$ sudo apt install nginx
– Start and enable Nginx at system startup using the following commands
$ sudo systemctl enable nginx
$ sudo systemctl start nginx
Step 2. Installing PHP
Ubuntu 18.04 LTS ships with the latest and greatest PHP version 7.2. To install PHP FPM and several most common PHP modules type:
$ sudo apt install php-fpm php-opcache php-cli php-gd php-curl php-mysql
Step 3. Installing Mariadb
– To install the latest version of MariaDB just follow our previous guide How to install MariaDB 10 Server on Ubuntu 18.04 LTS Bionic Beaver
Step 4.Test LEMP Stack
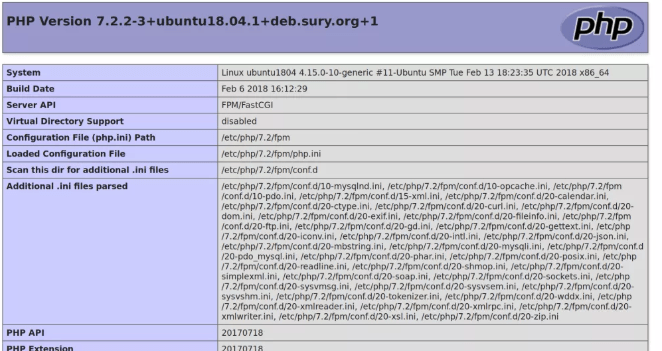
– Create a simple PHP Info page to test your LAMP Stack installation like below
$ sudo bash -c "echo -e '<?php\nphpinfo();\n?>' > /var/www/html/phpinfo.php"
– Open Nginx default site configuration file and uncomment the PHP block as shown in the code below:
$ vi /etc/nginx/sites-available/default
[...]
# pass PHP scripts to FastCGI server
        #
        location ~ \.php$ {
                include snippets/fastcgi-php.conf;
        #
        #       # With php-fpm (or other unix sockets):
                fastcgi_pass unix:/var/run/php/php7.2-fpm.sock;
        #       # With php-cgi (or other tcp sockets):
        #       fastcgi_pass 127.0.0.1:9000;
        }
– Restart Nginx using the following command:
$ systemctl restart nginx
– Now, open your web browser to your new LEMP install using the following URL: http://YOUR_SERVER_DOMAIN_OR_IP_ADDRESS/phpinfo.php
Conclusion
You have successfully installed LEMP Stack on your Ubuntu 18.04 LTS or Ubuntu 16.04 LTS server. You might want to check the following guides:
- How To Install PostgreSQL 11 on Ubuntu 18.04 LTS Bionic Beaver
- How To Install Apache Tomcat 9 Server on Ubuntu 18.04 LTS Bionic Beaver
- How to Install Zabbix Server 4 on Ubuntu 18.04 LTS Bionic Beaver
We hope this tutorial was enough Helpful. If you need more information, or have any questions, just comment below and we will be glad to assist you!


