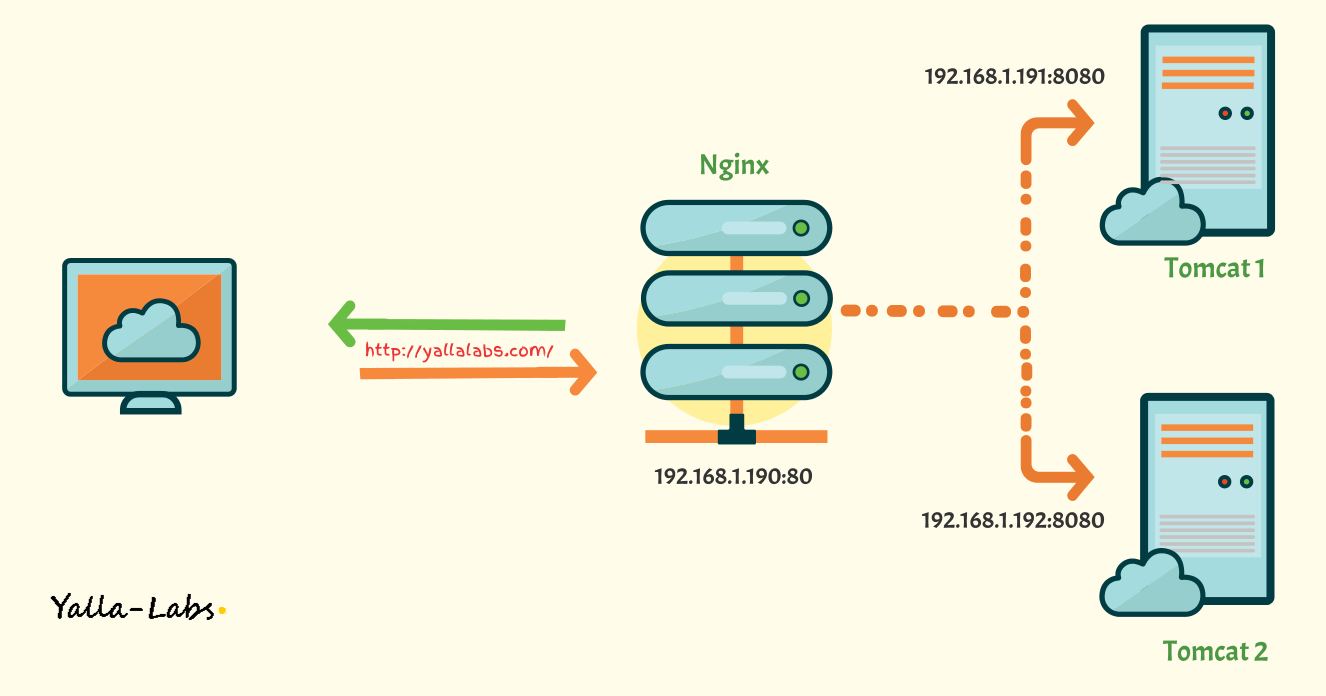
There are lots of options when it comes to choosing a Load Balancing solution for your Apache Tomcat servers, Apache HTTPD, and Nginx are currently some of the most commonly used all around open source solutions.
Nginx is a popular open-source web server, Load Balancer and reverse proxy, known for its high performance, stability, rich feature set, simple configuration, and low resource consumption.
This guide describes how to set up load balancing with Nginx for your Apache Tomcat servers. As a prerequisite, you’ll need to have at least two hosts with a Apache Tomcat servers installed and configured to see the benefit of the load balancer, if you didn’t installed yet Apache Tomcat you can check this guide: How to install Apache Tomcat 9 Server on CentOS 7 / Rhel 7
Setup Round Robin Nginx Load Balancer
In this example, we’ll show you how to build a cluster named appcluster1 with a simple round-robin load balancer. Let’s Create a new virtual server block called lbd01.yallalabs.local.conf or you can edit the nginx.conf file and modify the http section as below:
# cat  /etc/nginx/conf.d/lbd01.yallalabs.local.conf
upstream appcluster1 {
    server TOMCAT1_IP_ADDRESS:8080;
    server TOMCAT2_IP_ADDRESS:8080;
}
server {
  listen       80;
  server_name  tomcat.yallalabs.local www.tomcat.yallalabs.local;

  location / {
    proxy_pass http://appcluster1;
  }
}
Setup least-connected Nginx Load Balancer
In this example, we will show you how to setup Least-connected Load Balancer. In this algorithm the incoming request is sent to the server that has least number of existing active connection.
For this, add the keyword least_conn at the top of the upstream as shown below
upstream appcluster2 {
    server TOMCAT1_IP_ADDRESS:8080;
    server TOMCAT2_IP_ADDRESS:8080;
    least_conn;
}
server {
  listen       80;
  server_name  tomcat.yallalabs.local www.tomcat.yallalabs.local;

  location / {
    proxy_pass http://appcluster2;
  }
}
Setup Persistence or Sticky Nginx Load Balancer
– If your Tomcat application requires basic session persistence also known as sticky sessions, you can implement it in Nginx with the IP Hash load‑balancing algorithm.
IP hashing uses the visitors IP address as a key to determine which host should be selected to service the request. This allows the visitors to be each time directed to the same server. To configure session persistence in Nginx, add the ip_hash directive to the upstream block.
upstream appcluster3 {
    server TOMCAT1_IP_ADDRESS:8080;
    server TOMCAT2_IP_ADDRESS:8080;
    ip_hash;
}
server {
  listen       80;
  server_name  tomcat.yallalabs.local www.tomcat.yallalabs.local;

  location / {
    proxy_pass http://appcluster3;
  }
}
Conclusion
You have successfully configured Nginx as Load Balancer for your multiple Apache Tomcat Servers.
See also :
- How To Install Apache Tomcat 9 Server on Ubuntu 18.04 LTS & Ubuntu 16.04 LTS
- How To Configure Nginx as a Reverse Proxy for Apache Tomcat Server
- How To Configure Apache as a Reverse Proxy for Apache Tomcat Server
We hope this tutorial is enough helpful. If you need more information, or have any questions, just comment below and we will be glad to assist you!


