In this article we will explain how to setup a static IP address on Centos 7 / RHEL 7.There are several ways to configure a static IP address.
1. nmtui Tool ( Network Configuration Text User Interface)
2. nmcli Tool ( Network Manager Command Line )
3. Editing /etc/sysconfig/network-scripts/ifcfg-network_interface_name.fcg
For this tutorial, we’re going to assign to my server on my lab environment:
– IP address : 192.168.1.10
– NetMask 255.255.255.0
– Gateway 192.168.1.1
– Domain Name Servers : 192.168.1.2 192.168.1.3 ( In my lab environment i’ve two Dns Servers)
– Search Domains : yallalabs.com
Before starting let’s check current IP address and of our Centos 7 / RHEL 7 server :
[root@server ~]# ip addr show # or here u can use ip a s
1: lo: <LOOPBACK,UP,LOWER_UP> mtu 65536 qdisc noqueue state UNKNOWN
link/loopback 00:00:00:00:00:00 brd 00:00:00:00:00:00
inet 127.0.0.1/8 scope host lo
valid_lft forever preferred_lft forever
inet6 ::1/128 scope host
valid_lft forever preferred_lft forever
2: enp0s3: <BROADCAST,MULTICAST,UP,LOWER_UP> mtu 1500 qdisc pfifo_fast state UP qlen 1000
link/ether 08:00:27:5f:2e:0c brd ff:ff:ff:ff:ff:ff
inet 192.168.1.4/24 brd 192.168.1.255 scope global dynamic enp0s3
valid_lft 172747sec preferred_lft 172747sec
inet6 fe80::a00:27ff:fe5f:2e0c/64 scope link
valid_lft forever preferred_lft forever
Here, like you see, my network interface name is enp0s3 and the network configuration is automatically assigned by my DHCP server. Let’s start setting up a static ip address to our server .
1./ nmtui tool:
[root@server ~]# nmtui
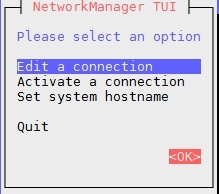
Select the network interface and select edit

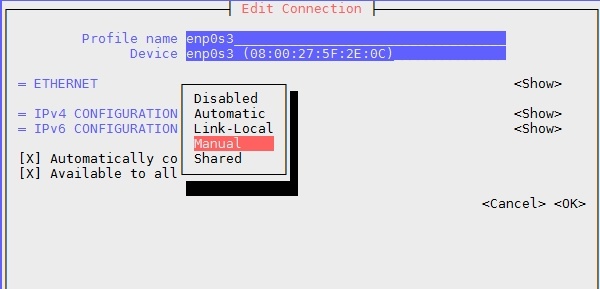
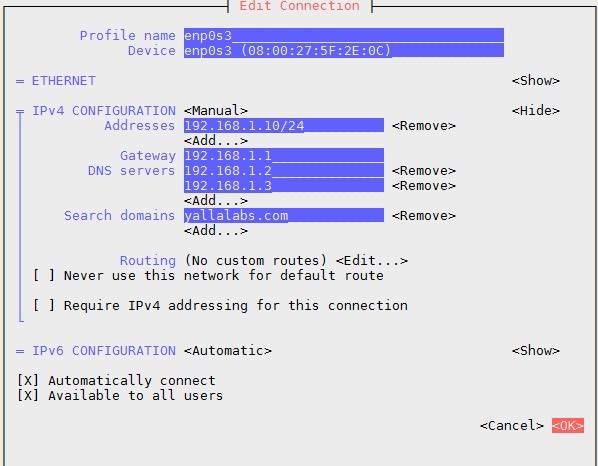
Here we will select IPv4 configuration from Automatic to Manual and click show to assign the static network configuration.

Remember to check Automatically connect to start the network device on boot and click ok .
By the way you can directly edit or connect an interface network device using:
[root@server ~]# nmtui edit enp0s3
[root@server ~]# nmtui connect enp0s3
Finally, restart the Network configuration daemon
[root@server ~]# systemctl restart NetworkManager
2. nmcli Tool ( Network Manager Command Line )
First, let’s display the network connections.
[root@server ~]# nmcli con show
NAME    UUID                                  TYPE            DEVICE
enp0s3  f503edde-d565-4e56-8eff-b276dc189938  802-3-ethernet  enp0s3
Let’s start.
[root@server ~]# nmcli con mod enp0s3 ipv4.method "manual" ipv4.addresses 192.168.1.10/24 ipv4.gateway 192.168.1.1 ipv4.dns "192.168.1.2 192.168.1.3" ipv4.dns-search yallalabs.com connection.autoconnect yes
if you want to display list of all informations of the network connection use this command.
[root@server ~]# nmcli con show enp0s3 # here put the name of the connection
3. Editing /etc/sysconfig/network-scripts/ifcfg-network_interface_name.fcg
[root@server ~]# cat /etc/sysconfig/network-scripts/ifcfg-enp0s3
BY default the configuration file will look like the block below.
TYPE=Ethernet
BOOTPROTO=dhcp
DEFROUTE=yes
IPV4_FAILURE_FATAL=no
NAME=enp0s3
UUID=f503edde-d565-4e56-8eff-b276dc189938
DEVICE=enp0s3
ONBOOT=yes
PEERDNS=yes
PEERROUTES=yes
To change the above setup to a static IP address configuration, replace BOOTPROTO value from dhcp to static or none as shown below.
BOOTPROTO=none
Then add the IP address, network mask, gateway, domain search and Dns for the server at the end and save the file.
IPADDR=192.168.1.10
PREFIX=24 #here you can use netmask if you like , NETMASK=255.255.255.0
GATEWAY=192.168.1.1
DNS1=192.168.1.2
DNS2=192.168.1.3
DOMAIN=yallalabs.com
Finally, restart the network service to insecure change takes effect.
[root@server ~]# systemctl restart network
That’s it for now. Enjoy..
PS. If you like this post please share it with your friends on the social networks using the buttons below.Thanks.


