About Zabbix
Zabbix is a free and open source network monitoring Software tool which is used to monitor and track the availability and performance of your IT infrastracture: servers, network devices and other IT assets.
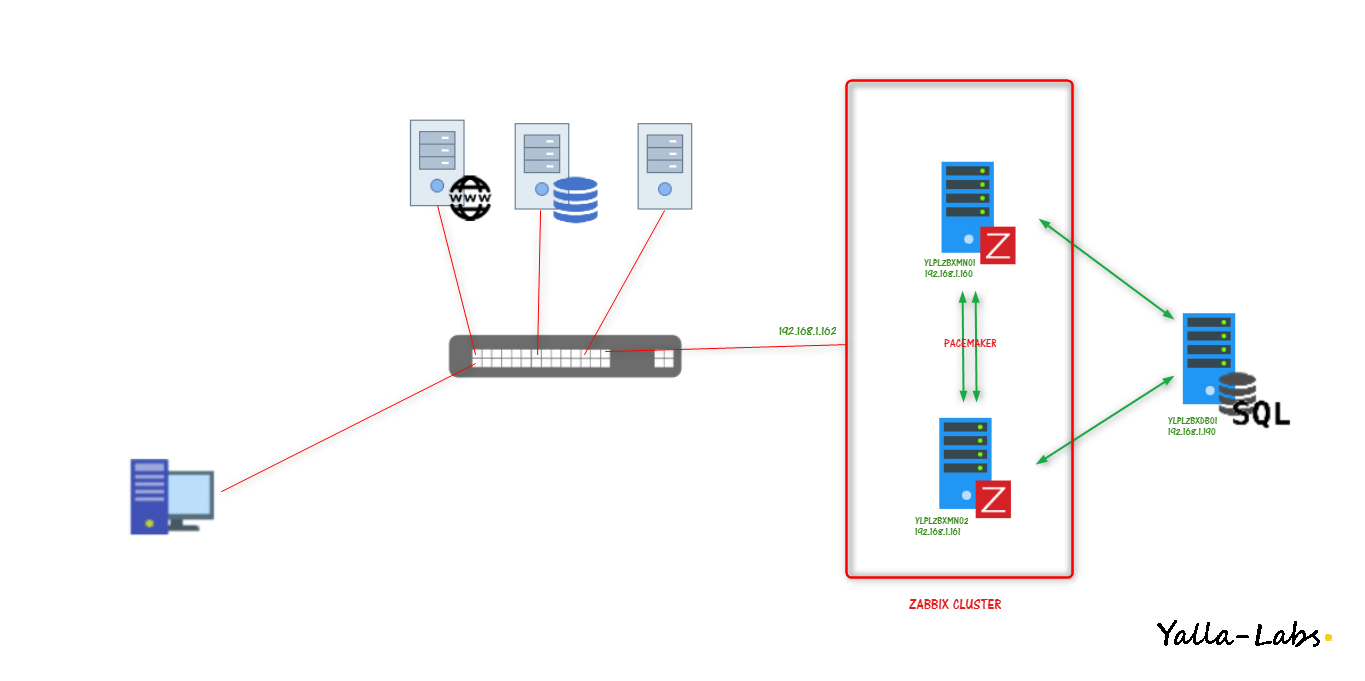
A high availability architecture is one of the key requirements for any Enterprise Deployment network. In this tutorial we will cover how to set up high availability Zabbix server. We are going to create a High Availability Active/Passive Cluster that will consist of two CentOS 7 / RHEL 7 servers with a Floating IP and using a shared database. In order to achieve the high availability we will use the Corosync cluster engine, and the Pacemaker resource manager.
Environment:
– Before we start make sure to disable Selinux on the both nodes in the cluster
# sed -i 's/^SELINUX=.*/SELINUX=disabled/g' /etc/sysconfig/selinux && reboot
– On both Zabbix Server nodes ylplzbxmn01 e ylplzbxmn02, we need to install the Zabbix repository using the below commands:
[root@ylplzbxmn01 ~]# rpm --import http://repo.zabbix.com/RPM-GPG-KEY-ZABBIX
[root@ylplzbxmn01 ~]# rpm -ivh http://repo.zabbix.com/zabbix/3.4/rhel/7/x86_64/zabbix-release-3.4-2.el7.noarch.rpm
– Now use the below command to install Zabbix and necessary packages:
[root@ylplzbxmn01 ~]# yum update
[root@ylplzbxmn01 ~]# yum install zabbix-server-mysql zabbix-web-mysql zabbix-agent zabbix-get -y
– On the Database Server ylplzbxdb01 Install the MariaDB Server package using the following Command:
[root@ylplzbxdb01 ~]# yum install mariadb-server -y
[root@ylplzbxdb01 ~]# systemctl enable mariadb && systemctl start mariadb
– First we need to create zabbix database (zabbixdb) and create a zabbix user (zabbixuser).
[root@ylplzbxdb01 ~]# mysql -u root -p
Enter password:
Welcome to the MariaDB monitor. Commands end with ; or \g.
Your MariaDB connection id is 10
Server version: 5.5.47-MariaDB MariaDB Server
Copyright (c) 2000, 2015, Oracle, MariaDB Corporation Ab and others.
Type 'help;' or '\h' for help. Type '\c' to clear the current input statement.
MariaDB [(none)]> CREATE DATABASE zabbixdb CHARACTER SET utf8 COLLATE utf8_bin;
Query OK, 1 row affected (0.00 sec)
MariaDB [(none)]> GRANT ALL PRIVILEGES ON zabbixdb.* TO zabbixuser@'%' IDENTIFIED BY "Password";
Query OK, 0 rows affected (0.00 sec)
MariaDB [(none)]> FLUSH PRIVILEGES;
Query OK, 0 rows affected (0.00 sec)
MariaDB [(none)]> exit
Bye
[root@ylplzbxdb01 ~]#
– On one of the nodes, use the scp tool to copy the create.sql.gz to your Database Server ylplzbxdb01:
[root@ylplzbxmn01 ~]# scp /usr/share/doc/zabbix-server-mysql-3.4.8/create.sql.gz [email protected]:/root/
– After creating the zabbix database and user we need to import the zabbix initial database using the below commands:
[root@ylplzbxdb01 ~]# zcat create.sql.gz | mysql -u zabbixuser -p zabbixdb
Enter password:
[root@ylplzbxdb01 ~]#
– On each node in the cluster, we need to edit database configuration in the zabbix server configuration file zabbix_server.conf by specifing the Database Host IP, Zabbix database name for Zabbix , Zabbix database user name and the password. We need also to specify the SourceIP that should be the Virtual IP Address of our cluster.
# vi /etc/zabbix/zabbix_server.conf
[...]
SourceIP=Virtual_IP_Address_Cluster
DBHost=IP_Address_DataBase_Server
DBName=zabbixdb
DBUser=zabbixuser
DBPassword=Password
– On each node in the cluster, we have to configure PHP timezone, open the file /etc/httpd/conf.d/zabbix.conf and uncomment the “date.timezone” line and change it to your timezone.
# vi /etc/httpd/conf.d/zabbix.conf
[...]
php_value date.timezone Europe/Rome
– On each node in the cluster, we need to make sure cluster nodes can communicate with eachother by their name. If you have a DNS server, add additional entries for the two machines. Otherwise, you’ll need to add the nodes to /etc/hosts file. Below are the entries for our cluster nodes:
# cat >> /etc/hosts << END
> 192.168.1.160 ylplzbxmn01 ylplzbxmn01.yallalabs.local
> 192.168.1.161 ylplzbxmn02 ylplzbxmn02.yallalabs.local
> END
– If you are running the firewalld daemon, On each node in the cluster execute the following commands to enable the necessary ports
# firewall-cmd --permanent --add-service=high-availability
success
# firewall-cmd --permanent --add-service=http
success
# firewall-cmd --permanent --add-port=10051/tcp
success
# firewall-cmd --permanent --add-port=10050/tcp
success
# firewall-cmd --reload
success
– On each node in the cluster, install the High Availability packages as below
[root@ylplzbxmn01 ~]# yum install pacemaker pcs -y
– In order to use pcs to configure the cluster and communicate among the nodes, you must set a password on each node for the user ID hacluster, which is the pcs administration account.
# passwd hacluster
Changing password for user hacluster.
New password:
Retype new password:
passwd: all authentication tokens updated successfully.
– On each node in the cluster, execute the following commands to start and enable the pcsd service at system boot.
# systemctl start pcsd
# systemctl enable pcsd
Created symlink from /etc/systemd/system/multi-user.target.wants/pcsd.service to /usr/lib/systemd/system/pcsd.service.
– on the first node ylplzbxmn01, execute the following command to authenticate the pcs user hacluster for each node in the cluster
[root@ylplzbxmn01 ~]# pcs cluster auth ylplzbxmn01 ylplzbxmn02
Username: hacluster
Password:
ylplzbxmn01: Authorized
ylplzbxmn02: Authorized
– On the first node ylplzbxmn01, execute the following command to create the cluster named zabbixserver that consists of the nodes ylplzbxmn01 and ylplzbxmn02:
[root@ylplzbxmn01 ~]# pcs cluster setup --name zabbixserver ylplzbxmn01 ylplzbxmn02
Destroying cluster on nodes: ylplzbxmn01, ylplzbxmn02...
ylplzbxmn01: Stopping Cluster (pacemaker)...
ylplzbxmn02: Stopping Cluster (pacemaker)...
ylplzbxmn01: Successfully destroyed cluster
ylplzbxmn02: Successfully destroyed cluster

Sending 'pacemaker_remote authkey' to 'ylplzbxmn01', 'ylplzbxmn02'
ylplzbxmn02: successful distribution of the file 'pacemaker_remote authkey'
ylplzbxmn01: successful distribution of the file 'pacemaker_remote authkey'
Sending cluster config files to the nodes...
ylplzbxmn01: Succeeded
ylplzbxmn02: Succeeded

Synchronizing pcsd certificates on nodes ylplzbxmn01, ylplzbxmn02...
ylplzbxmn01: Success
ylplzbxmn02: Success
Restarting pcsd on the nodes in order to reload the certificates...
ylplzbxmn01: Success
ylplzbxmn02: Success
– To start the cluster services on both nodes of the cluster, it’s engouh to execute the below command on the first node ylplzbxmn01:
[root@ylplzbxmn01 ~]# pcs cluster start --all
ylplzbxmn01: Starting Cluster...
ylplzbxmn02: Starting Cluster...
– On each node in the cluster, run the following commands to enable the corosync and the Pacemaker daemon to start at boot using:
# systemctl enable corosync
# systemctl enable pacemaker
– To display the current status of the cluster, execute the following command:
[root@ylplzbxmn01 ~]# pcs status cluster
Cluster Status:
 Stack: corosync
 Current DC: ylplzbxmn02 (version 1.1.16-12.el7_4.8-94ff4df) - partition with quorum
 Last updated: Tue Apr 17 21:20:40 2018
 Last change: Tue Apr 17 21:17:44 2018 by hacluster via crmd on ylplzbxmn02
 2 nodes configured
 0 resources configured

PCSD Status:
  ylplzbxmn01: Online
  ylplzbxmn02: Online
– To display just the current status of the cluster nodes, run the following command:
[root@ylplzbxmn01 ~]# pcs status nodes
Pacemaker Nodes:
 Online: ylplzbxmn01 ylplzbxmn02
 Standby:
 Maintenance:
 Offline:
Pacemaker Remote Nodes:
 Online:
 Standby:
 Maintenance:
 Offline:
– We are not going to use the Stonith, let’s disable it, on the first node in the cluster, run the following command:
[root@ylplzbxmn01 ~]# pcs property set stonith-enabled=false
– Since we have only two nodes, it’s not necessary to enable the Quorum, on the first node in the cluster, use the following command to disable it :
[root@ylplzbxmn01 ~]# pcs property set no-quorum-policy=ignore
– Our first resource will be an IPaddr2 resource, which is a floating IP address to access the zabbix Frontend, the resource will be named cluster_vip and we will assign the floating IP address 192.168.1.162 with a netmask 24
[root@ylplzbxmn01 ~]# pcs resource create cluster_vip ocf:heartbeat:IPaddr2 ip=192.168.1.162 cidr_netmask=24 op monitor interval=20s
– Let’s now create a new systemd resource called zabbix_server for the zabbix Server deamon and be monitored operations every 10 seconds:
[root@ylplzbxmn01 ~]# pcs resource create zabbix_server systemd:zabbix-server op monitor interval=10s
– We need to create an Apache resource called httpd, it’s going to be monitored evey secondes:
[root@ylplzbxmn01 ~]# pcs resource create httpd systemd:httpd op monitor interval=10s
– To facilate the management the cluster, we are going to create a group resource called grp_zabbix_httpd where be composed by zabbix_server and httpd resource
[root@ylplzbxmn01 ~]# pcs resource group add grp_zabbix_httpd zabbix_server httpd
– To ensure resources run on the same node, to achieve that we are going to use colocation constraint, execute the following command to ensure resource group grp_zabbix_httpd and the float IP Address resource cluster_vip are started on the same node, The INFINITY score also means that if cluster_vip is not active anywhere, grp_zabbix_httpd will not be permitted to run.
[root@ylplzbxmn01 ~]# pcs constraint colocation add grp_zabbix_httpd cluster_vip INFINITY
– To make sure that cluster resources start and stop in order, we will use order constraint, we need to make sure the float IP Address resource cluster_vip not only runs on the same node, but starts before the resource group grp_zabbix_httpd use the following command:
[root@ylplzbxmn01 ~]# pcs constraint order cluster_vip then grp_zabbix_httpd
Adding cluster_vip grp_zabbix_httpd (kind: Mandatory) (Options: first-action=start then-action=start)
– After creating our resources, let’s check the status of the cluster.
[root@ylplzbxmn01 ~]# pcs status
Cluster name: zabbixserver
Stack: corosync
Current DC: ylplzbxmn02 (version 1.1.16-12.el7_4.8-94ff4df) - partition with quorum
Last updated: Tue Apr 17 21:30:34 2018
Last change: Tue Apr 17 21:28:15 2018 by root via cibadmin on ylplzbxmn01

2 nodes configured
3 resources configured

Online: [ ylplzbxmn01 ylplzbxmn02 ]

Full list of resources:

 cluster_vip    (ocf::heartbeat:IPaddr2):       Started ylplzbxmn01
 Resource Group: grp_zabbix_httpd
     zabbix_server      (systemd:zabbix-server):        Started ylplzbxmn01
     httpd      (systemd:httpd):        Started ylplzbxmn01

Daemon Status:
  corosync: active/enabled
  pacemaker: active/enabled
  pcsd: active/enabled
– Note that all the resources are running on the same node ylplzbxmn01, now we need to finish the installation of the zabbix Frontend, open the browser and point to the Float IP address of our cluster http://Float_IP_ADDRESS/zabbix/
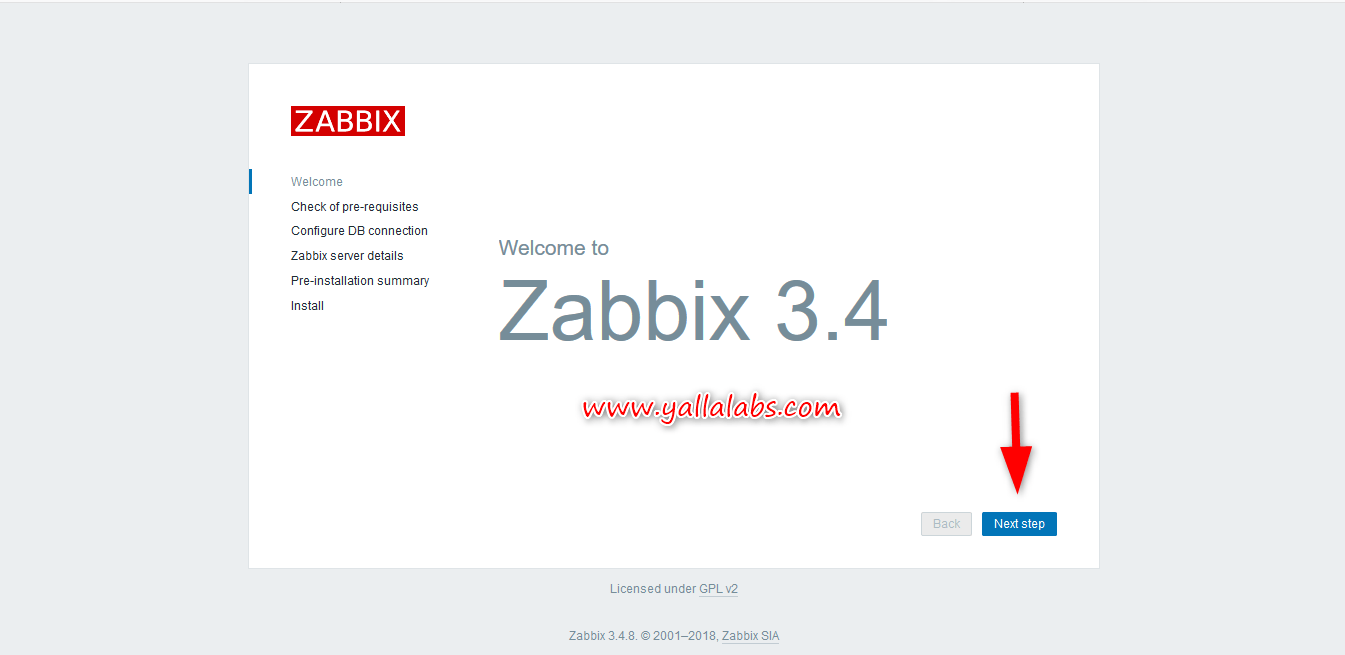
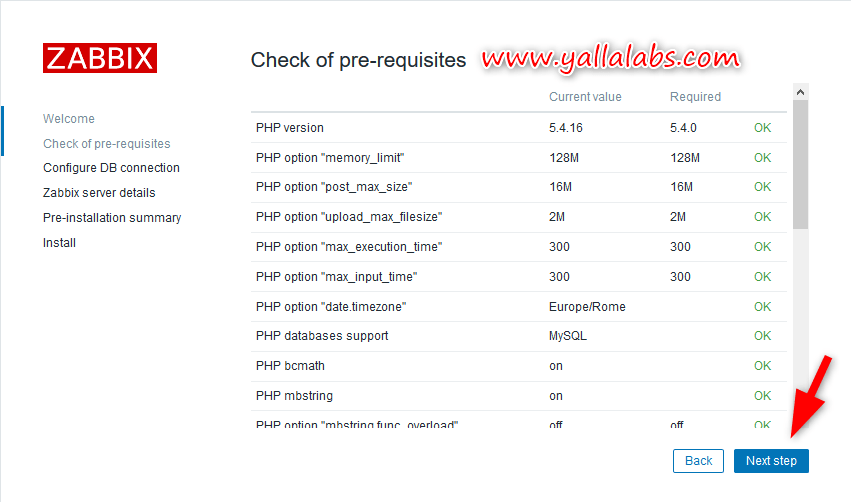
– Make sure that all software prerequisites are met and click Next Step
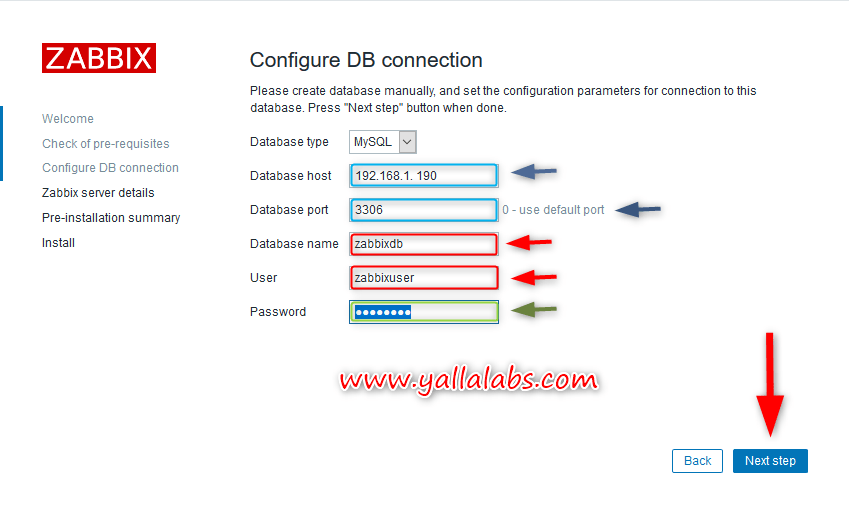
– Enter the details to connect to the zabbix database and click Next Step
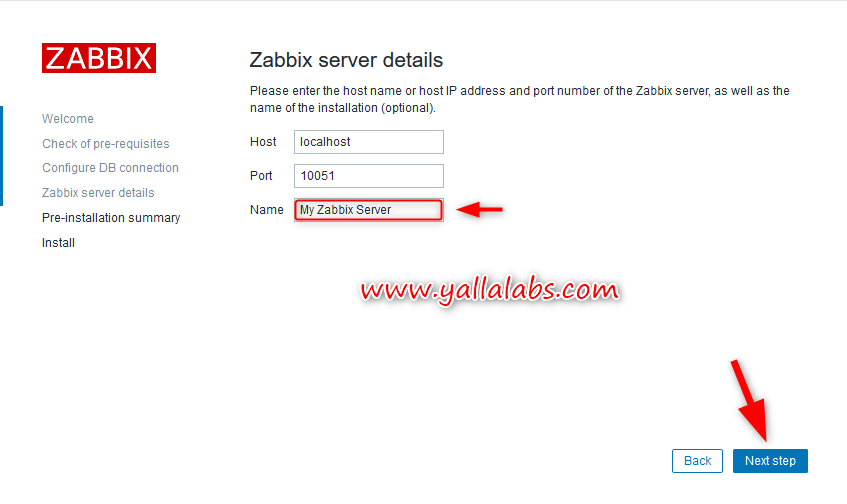
– Enter Zabbix server details and click Next Step button
– Review the pre-installation summary and click Next Step button.
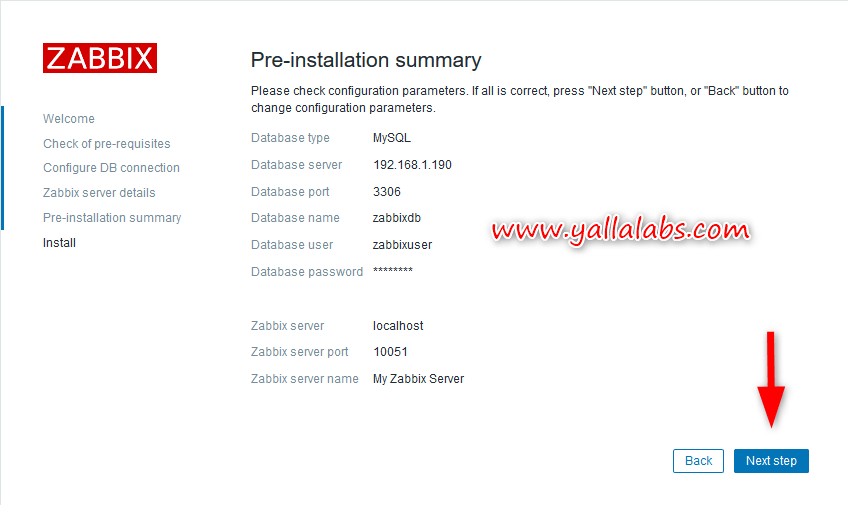
– Finish the installation by clicking the button Finish
– Now you’ll be redirected to the zabbix Frontend Signin page. The default user name is Admin and the password is zabbix.

– When you are done with the installation, we have to copy the generated php file zabbix.conf.php to the passive node, in this case the passive node is ylplzbxsrv02
[root@ylplzbxmn01 ~]# scp /etc/zabbix/web/zabbix.conf.php [email protected]:/etc/zabbix/web/zabbix.conf.php
– Finally, let’s test the fail over to the passive node ylplzbxmn02, all the resource are active in the first node ylplzbxmn01 we should put it in standby like this all the resource well move the second node
[root@ylplzbxmn01 ~]# pcs cluster standby ylplzbxmn01
– After putting the first node in standby, check the status of the cluster, all the resource should run in the second node
[root@ylplzbxsrv01 ~]# pcs status
Cluster name: zabbixserver
Stack: corosync
Current DC: ylplzbxsrv02 (version 1.1.16-12.el7_4.8-94ff4df) - partition with quorum
Last updated: Sun Apr 22 22:43:07 2018
Last change: Sun Apr 22 22:42:16 2018 by root via cibadmin on ylplzbxsrv01

2 nodes configured
3 resources configured

Node ylplzbxsrv01: standby
Online: [ ylplzbxsrv02 ]

Full list of resources:

 cluster_vip    (ocf::heartbeat:IPaddr2):       Started ylplzbxsrv02
 Resource Group: grp_zabbix_httpd
     zabbix_server      (systemd:zabbix-server):        Started ylplzbxsrv02
     httpd      (systemd:httpd):        Started ylplzbxsrv02

Daemon Status:
  corosync: active/enabled
  pacemaker: active/enabled
  pcsd: active/enabled
We hope this tutorial was enough Helpful. If you need more information, or have any questions, just comment below and we will be glad to assist you!




45 comments
Very Nice, I can learn a lot. Thanks
Hallo I Have a problem
pcs status
Cluster name: zabbixserver
Stack: corosync
Current DC: zabbix2 (version 1.1.18-11.el7_5.3-2b07d5c5a9) – partition with quorum
Last updated: Sat Aug 25 15:07:46 2018
Last change: Sat Aug 25 15:07:26 2018 by root via cibadmin on zabbix1
2 nodes configured
3 resources configured
Online: [ zabbix1 zabbix2 ]
Full list of resources:
cluster_vip (ocf::heartbeat:IPaddr2): Stopped
Resource Group: grp_zabbix_httpd
zabbix_server (systemd:zabbix-server): Stopped
httpd (systemd:httpd): Stopped
Failed Actions:
* cluster_vip_monitor_0 on zabbix2 ‘not installed’ (5): call=5, status=complete, exitreason=’Setup problem: couldn’t find command: ip’,
last-rc-change=’Sat Aug 25 15:00:52 2018′, queued=0ms, exec=118ms
* cluster_vip_monitor_0 on zabbix1 ‘not installed’ (5): call=5, status=complete, exitreason=’Setup problem: couldn’t find command: ip’,
last-rc-change=’Sat Aug 25 15:00:52 2018′, queued=0ms, exec=116ms
Daemon Status:
corosync: active/enabled
pacemaker: active/enabled
pcsd: active/enabled
Hi,
I guess you are having a problem with the Virtual IP resource, i think you have to put a node in stopped mode and try again.
the same problem
Full list of resources:
cluster_vip (ocf::heartbeat:IPaddr2): Stopped
Resource Group: grp_zabbix_httpd
zabbix_server (systemd:zabbix-server): Stopped
httpd (systemd:httpd): Stopped
Failed Actions:
* cluster_vip_monitor_0 on zabbix1 ‘not installed’ (5): call=5, status=complete, exitreason=’Setup problem: couldn’t find command: ip’,
last-rc-change=’Sat Aug 25 17:09:23 2018′, queued=0ms, exec=15ms
Did you tried to clean up the resource that having issue, try to use the command pcs resource cleanup cluster_vip .
In the case doesn’t work I guess you need to check the syntax of the cluster_vip resource it seems that you miss configured it
yum install which fix the Problem
Could u please tell us how did you fix that
Hi, does this mean that I can do HA for my 2 zabbix servers that in a different network? As they are in different datacenter.
Meaning if server1 in DC1 loses connectivity with server2 for whatever reason (datacenter burnt or server crash), server2 in DC2 will take over the monitoring and start doing SNMP, ICMP etc. towards devices.
If you want to reach a high availability between different geographical sites, i guess it’s better to use Vmware HA and FA if you are using a vmware virtualization technology.
NOTE: When I created the cluster_vip I needed to add nic option to get it working
pcs resource create cluster_vip ocf:heartbeat:IPaddr2 ip=XXXXX cidr_netmask=XXX nic=NIC op monitor interval=20s
to get the nic:
cat /etc/sysconfig/network-scripts/ifcfg-e* | grep DEVICE
Hi Maria,
Thanks for the commment regarding the nic option .
Hi, Lofti,
Great material, about zabbix and HA, good explain.
Congratulations
Hi Hernandes,
You are welcome, we are so glad that our tutorials are so helpful. Please subscribe to our YouTube channel and share the content with others.
Hi,
I´m having some troubles with the zabbix agent,
I can´t see any error logs.
`tail -f /var/log/zabbix/zabbix_agentd.log`
I can see this error in the Zabbix UI: Configuration -> Hosts
`Get value from agent failed: cannot connect to [[IP]:10050]: [4] Interrupted system call`
If I execute from Zabbix Server
zabbix_get -s
IP -p 10050 -k system.cpu.load[all,avg15]
I get a response, so that means the connectivity between VMs is fine
Does anyone know what could be happening? Is there any special property in zabbix_agentd.conf that needs to be set? Or in zabbiz-server config file?
Thank you
First, in you zabbix agent server config file
zabbix_agentd.conf, you need to setup the the value ofServerandServerActivewith your zabbix server IP address.Second, make sure that that name used to register the zabbix agent is the same on your zabbix Frontend.
YesI have those values configured.
But Do I need any extra config? If I add the server to a no HA Zabbix it works. I mean If I configure the non HA Zabbiz IP in Server and ServerActive in zabbix_agentd.conf it works, I can see the agent working properly.
But when I change it for the HA Zabbix IP (either the Virtual one or the Primary Zabbix server) it doesn´t work. I get this error in the UI:
“Get value from agent failed: cannot connect to [[IP]:10050]: [4] Interrupted system call“
Hi, try to modify the value of
SourceIPtoSourceIP=0.0.0.0orSourceIP=Virtual_IP_Address_Clusteron thezabbix_server.confconfig file and restart the zabbix server one by one.SourceIP=0.0.0.0 WORKED! Thanks a million! 🙂
Hi Maria,
It’s better to use the Virtual ip of the cluster like been mentioned in the tutorial.
Hi Lotfi!
I configured high available Zabbix server as you explicated. Do you know why Zabbix send me two equal alert emails?
Thank!
Hi Nico,
Check please the configuration of your triggers and actions maybe u mis-configured something.
Hi
I´m installing this procediment with zabbix 4.2 and not runnig…… I had create 5 system with 3 servers, in different ip´s and all stopped in the same error:
3 step when configure access to databse
Error connecting to database: Can’t connect to MySQL server on ‘192.168.0.210’ (13)
Do you install this procediment with zabbix 4?
Regards
Hi,
This guide can be applied to zabbix server 4.x, the import of database should be done just in one node and after that connect to the your float ip and finish the installation.
Hi,
I have imported the bbdd as indicated, but the same error keeps coming out, I have tried it from different computers but it still fails.
I have tried to connect with XAMPP and it connects correctly, if I do telnet it also connects.
It just fails when I go to http: // ip_virtual / zabbix and I do step 3 ( Enter the details to connect to the zabbix database and click Next Step)
Make sure that you can access to your database server remotely and ther’s no firewall blocking between the remote zabbix database server and the zabbix server cluster nodes.
In the SourceIP=Virtual_IP_Address_Cluster I put the equal ip that:
pcs resource create cluster_vip ocf:heartbeat:IPaddr2 ip=192.168.137.220 cidr_netmask=24 op monitor interval=20s
It is correct?
Hi Jesus,
Yes, it’s correct. The source IP should be your Float IP( virtual IP).
Hi,
Great article but i’m stuck on the step to declare the SourceIP=Virtual_IP_Address_Cluster in zabbix_server.conf.
I have 2 zabbix instances on 2 different availability zones (2 different subnet) and i don’t know how to deal with the Virtual IP for the cluster… does the ALB (load balancer) will handle this IP ? How ? thanks for your light
Hi,
The virtual IP here is the float IP of your pacemaker cluster that will be configured, it’s not important to be in the same subnet, the important thing that both nodes could comunicate between them.
hi
i followed every instruction but when i standby a node the othe one ps status shows that resources stopped …. and zabbix gone too …no failover happening just i have ping of the float ip
what should i do ?
Hi Sara,
when you put a one of the nodes on standby, the resources should been moved to the other node, it’s a bit strange, you have to check your configuration.
I configured step by step and used this command to create VIP
pcs resource create cluster_vip ocf:heartbeat:IPaddr2 ip=127.0.0.2 cidr_netmask=24 op monitor interval=20s
I can access zabbix dashboard on 127.0.0.2, however I am facing two problems.
1) Since zabbix agent is running on both master 1 and master 2, its creating conflict in DB
PGRES_FATAL_ERROR:ERROR: duplicate key value violates unique constraint “events_pkey”
and I see this error on dashboard ” Zabbix server is not running: the information displayed may not be current”
2) What IP entry do I make in my zabbix agents? They won’t be able to pick up zabbix server since its running on 127.0.0.2 and it fails to even telnet
Hi Lotfi,
Zabbix server and dasboard is set up already and we now need to set up the pacemaker. SO can i use the same dashboard ip as VIP here or need to apply for new VIP. Please asdvise
Hi,
You need to configure a vip for pacemaker cluster configuration
Hi Lofti,
Thanks for your article, it has helped me to quickly configure a Zabbix 4.4 cluster with a Galera/MariaDB cluster as the database back end. One question I have is about fencing devices and why not to use them. Please explain.
Regards.
Hi, you can use fencing of course, it’s absolutely recommended to implement fencing in your cluster.
Hi Lotfi,
Thanks for this tutorial. I was able to configure HA but I have a question. What if the db node goes down? Zabbix won’t be accessible.
But what if there is no separate db node. The db is instead installed on the cluster nodes. How do you synchronized the database between two nodes?
Many Thanks
Hi,
we are so glad that our tutorial was useful, yes in this tutorial we used a single db node, but you can use 2 database nodes installed in the same Zabbix servers, and you have to setup a master to master replication between your 2 mariadb/ mysql instances.
Hi how can we configure SSL in this setup.
Adding cluster_vip grp_zabbix_httpd (kind: Mandatory) (Options: first-action=start then-action=start)
Adding cluster_vip grp_zabbix_httpd (kind: Mandatory) (Options: first-action=start then-action=start)
getting this error -bash: syntax error near unexpected token `(‘
Cluster name: zabbixserver
Stack: corosync
Current DC: node1 (version 1.1.23-1.el7_9.1-9acf116022) – partition with quorum
Last updated: Mon Dec 6 03:00:36 2021
Last change: Mon Dec 6 02:59:39 2021 by root via cibadmin on node1
2 nodes configured
3 resource instances configured
Online: [ node1 node2 ]
Full list of resources:
cluster_vip (ocf::heartbeat:IPaddr2): Started node1
Resource Group: grp_zabbix_httpd
zabbix_server (systemd:zabbix-server): Started node2
httpd (systemd:httpd): Started node2
Daemon Status:
corosync: active/enabled
pacemaker: active/enabled
pcsd: active/enabled
MY RECSOURCE’S ARE STARTED BUT ALL OF THEM ARE NOT ON SAME NODE…NOW WHAT SHOULD I DO now???
Hi,
you can move the resource group manually to the node where you have cluster_vip by running the below command:
pcs resource move grp_zabbix_httpd node1[Im Getting this error, ]
[root@localhost ~]# pcs resource move grp_zabbix_httpd node1
Error: error moving/banning/clearing resource
Error performing operation: grp_zabbix_httpd is already active on node1
Error performing operation: Invalid argument
i also tried to move all of them to node 2 , when i do this cluster is started on node1..
Kindly reply me as soon as possible u can ,
This task is included in my Final year project , tommorow might be our final presentation….so time i have is limited
I had resolve that problem BY DISABLING THE CLUSTER ON NODE TWO AND THEN MOVE IT AND THEN ENABLE IT ON NODE 1,
Now my PCS status is
Cluster name: zabbixserver
Stack: corosync
Current DC: node2 (version 1.1.23-1.el7_9.1-9acf116022) – partition with quorum
Last updated: Tue Dec 7 05:00:01 2021
Last change: Tue Dec 7 04:54:37 2021 by root via cibadmin on node1
2 nodes configured
3 resource instances configured
Online: [ node1 node2 ]
Full list of resources:
Resource Group: grp_zabbix_httpd
zabbix_server (systemd:zabbix-server): Started node1
httpd (systemd:httpd): Started node1
cluster_vip (ocf::heartbeat:IPaddr2): Started node1
Daemon Status:
corosync: active/enabled
pacemaker: active/enabled
pcsd: active/enabled
NOW THE PROBLEM IS THAT , ZABBIX DASHBOARD IS OPENING ON -NODE 1 IP ADDRESS- NOT ON THE VIRTUAL IP ADDRESS(192.168.1.162,)