Jenkins is an open source, Java-based automation server that offers an easy way to set up a continuous integration and continuous delivery (CI/CD) pipeline.
Continuous Integration (CI) is the process of automating the build and testing of code every time a team member commits changes to version control. Continuous Delivery (CD) is the process to build, test, configure and deploy from a build to a production environment.
This tutorial demonstrates the steps of adding a linux Jenkins Agent Nodes, this tutorial assumes that you already have a Jenkins server installed.
Prerequisites
Before continuing with this tutorial, make sure you are logged in as a user with sudo privileges.
On the Agent machine:
1- Install the necessary packages
You will need to install some packages on the agent node, such as Java, use the below command to install the openjdk:
# sudo yum install java-1.8.0-openjdk
2- Create a user on the agent to be used by Jenkins
Now we need to create a user on the agent. The Jenkins master will log into the agent as this user, and all build jobs will execute as this user. The new user will be called jenkins with /var/lib/jenkins as home directory:
# sudo useradd -d /var/lib/jenkins jenkins
# passwd jenkins
3- Generate an ssh key
Next, we need to generate an ssh key. Jenkins will use this key to authenticate with the agent node and log in as the jenkins user. This key can be generated on practically any Linux machine, but you can also do it on the agent node itself and copy it to the new agents nodes:
# su - jenkins
# ssh-keygen -t rsa -C "Jenkins agent key"
Generating public/private rsa key pair.
Enter passphrase (empty for no passphrase):
Enter same passphrase again:
Your identification has been saved in /var/lib/jenkins/.ssh/id_rsa.
Your public key has been saved in /var/lib/jenkins/.ssh/id_rsa.pub.
The key fingerprint is:
SHA256:5qJWiPnvv+Gozm8iP+Ered03HgLJW2eyW0tzA5r1YYU jenkins ssh slaves
The key's randomart image is:
+---[RSA 2048]----+
|                 |
|             .   |
|            E .  |
|     . .     .   |
|   o .+ S = o    |
|  o o .* O + .   |
|   + +o.B = +    |
|  +.B.o+.*o= .   |
|   BBX=.=+o.     |
+----[SHA256]-----+
– Add the public SSH key id_rsa.pub to the list of authorized_keys file like below:
# cat ~/.ssh/id_rsa.pub >> ~/.ssh/authorized_keys
# chmod 600 ~/.ssh/authorized_keys
– Copy the private SSH key ~/.ssh/id_rsa from the agent machine to your OS clipboard. The SSH private key should be similiar to this:
# cat ~/.ssh/id_rsa
-----BEGIN RSA PRIVATE KEY-----
...................................
...................................
...................................
-----END RSA PRIVATE KEY-----
In Jenkins Server:
1- Go to Manage Jenkins -> Manage Nodes:

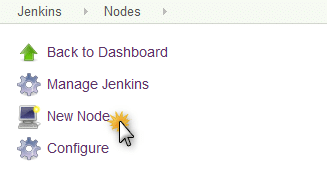
2- Then click on the New Node button:
3- Configure the name of the agent, select Permanent agent and click on the Ok button:

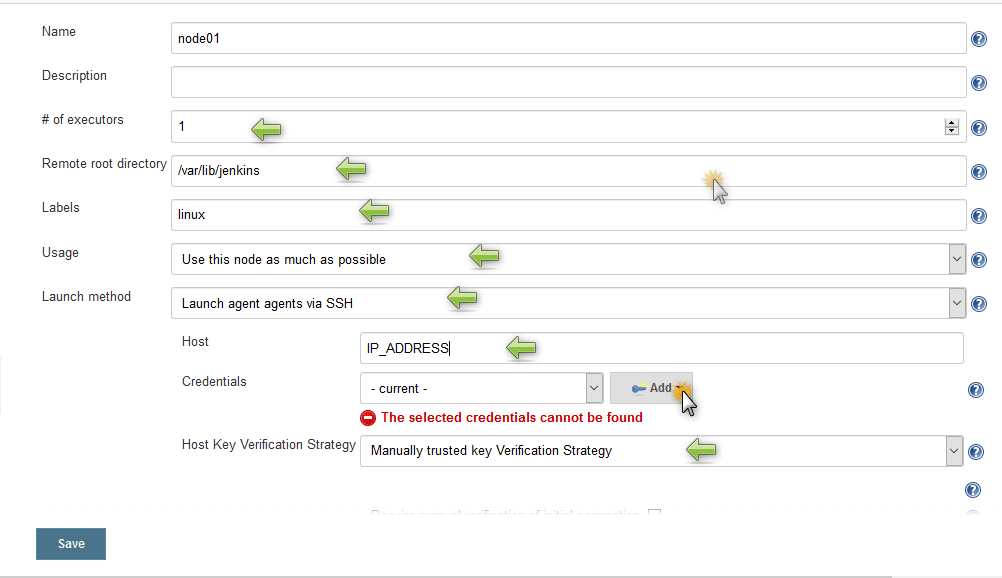
4- After creating the new node, you have to configure the node settings. Fill in the Remote root directory with a path the user on the agent is allowed to write to, set the Host value with the hostname of the agent, and press the Add button for Credentials :
5- Choose SSH Username with private key option, fill the Username value with the user account on the agent machine, in our example is jenkins, and choose Private Key -> Enter directly and paste the key from your OS clipboard, and give an ID and a useful Description for this credential. Finally click the add button.
6- Select the Manually trusted key Verification Strategy value of the Host Key Verification Strategy menu and click save button.
7- Your new node should now appear in the list of nodes. You may notice a red X on the node’s icon. This indicates that it is not connected yet. Wait a few seconds and refresh the page, and the red X will go away, indicating that the node is successfully connected.
Conclusion
You have successfully created a Jenkins agent node, you can use the same pubblic key to add a new agent nodes, the next step is to install the tools that you may require to run your builds like Git, Maven, Ant, Gradle, etc… You might want to check the following guides:


2 comments
Amazing artile. Well detailed. Ran through it only once.
Thanks bruv
very nicely written article. Thanks.